Node.JS
在生产环境下安装配置使用Node.JS
在生产环境下运行Node应用,你需要保持稳定 高性能和安全,并且是可维护的,这篇文章列举了Node.js在生产环境中需要的库包和注意事项。
这篇文章需要你熟悉了解流程process是什么, upstart/systemd/init是什么和process signals. 包括项目配置和脚本等源码项目在https://github.com/dickeyxxx/node-sample.使用Digital Ocean 和 Fedora.
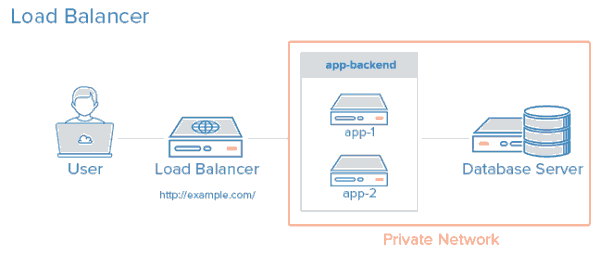
案例的生产环境是三个服务器,一个是负载平衡器(lb)和两个应用服务器 (app1 和 app2). 负载平衡器会进行健康检查,在两个服务器之间进行负载平衡,应用服务器综合使用systemd 和 node cluster进行负载平衡,在多个Node流程之间路由负载,部署将是可通过开发者笔记本实现一行命令方式部署,运行是可失败恢复的零当机时间。
systemd提供超过新贵一些显著的优势,包括先进的,集中式日志记录支持,配置更简单,速度快和更多的功能。案例使用Fedora.
下面是在 Fedora上安装步骤:
1.安装Node.js:
yum update -y
yum install -y git nodejs npm
npm install -g n
n stable
2.创建web用户
# useradd -mrU web
3.加入应用
- 为应用创建目录: # mkdir /var/www
- 设置拥有者给web: # chown web /var/www
- 设置群 web: # chgrp web /var/www
- 进入: # cd /var/www/
- 以web用户登录: $ su web
- Clone下载hello world应用: $ git clone https://github.com/dickeyxxx/node-hello-world,源码内容如下:
var http = require('http');
var PORT = process.env.PORT || 3000;
http.createServer(function (req, res) {
console.log('%d request received', process.pid);
res.writeHead(200, {'Content-Type': 'text/plain'});
res.end('Hello world!\n');
}).listen(PORT);
console.log('%d listening on %d', process.pid, PORT); - 运行应用:$ node app.js.
- 你可以通过浏览器访问IP得到hello world输出
- 打开防火墙:
# iptables -F
firewall-cmd --permanent --zone=public --add-port=3000/tcp
应用运行在3000端口,我们负载平衡器是80端口
systemd
现在我们已经一个运行的应用,使用systemd 确保我们应用在崩溃时能再次运行。systemd 脚本:
[Service]
WorkingDirectory=/var/www/node-hello-world
ExecStart=/usr/bin/node app.js
Restart=always
StandardOutput=syslog
StandardError=syslog
SyslogIdentifier=node-hello-world
User=web
Group=web
Environment='NODE_ENV=production'
[Install]
WantedBy=multi-user.target
- 在超级用户root下复制该文件到 /etc/systemd/system/node-sample.service
- 激活: # systemctl enable node-sample
- 开启: # systemctl start node-sample
- 查看状态: # systemctl status node-sample
- 观看日志: # journalctl -u node-sample
你可以杀死Node流程的pid,会发现它又启动了。
集群流程
现在我们有一个流程Node运行,我们需要使用node cluster将负载平衡到多个流程上,这里是实现零当机的脚本,只要在运行app.js后,运行:$ node boot.js
这个脚本运行应用的两个实例,如果一个死了彼此会重新启动,通过发送SIGHUP可实现零当机重新启动.可以通过$ kill -hup [pid].杀死看看。
为了启动集群,需要更新systemd配置,。加入ExecReload=/bin/kill -HUP $MAINPID 属性到你的systemd配置, 你能运行# systemctl reload node-sample 实现零当机重新启动。这里是Node cluster systemd 配置:
[Service]
WorkingDirectory=/var/www
ExecStart=/usr/bin/node boot.js
ExecReload=/bin/kill -HUP $MAINPID
Restart=always
StandardOutput=syslog
StandardError=syslog
SyslogIdentifier=node-sample
User=web
Group=web
Environment='NODE_ENV=production'
[Install]
WantedBy=multi-user.target
负载平衡
在生产环境下,你至少需要两个服务器,以防止一个当机,负载平衡器能实现健康检查,发现有问题的服务器会不再将请求发送给它。
第一步设置另外Node.js 应用服务器,如同之前上面步骤。
安装平衡器:
安装haproxy: # yum install haproxy
改变/etc/haproxy/haproxy.cfg 为下面配置,用你的IP替代。
defaults
log global
mode http
option httplog
option dontlognull
option http-server-close
option forwardfor
option redispatch
retries 3
timeout http-request 10s
timeout queue 1m
timeout connect 10s
timeout client 1m
timeout server 1m
timeout http-keep-alive 10s
timeout check 10s
frontend main *:80
stats enable
stats uri /haproxy?stats
stats auth myusername:mypass
default_backend app
backend app
balance roundrobin
server app1 107.170.145.120:3000 check
server app2 192.241.205.146:3000 check
重启haproxy: systemctl restart haproxy
你会看到应用运行在80端口,你也可以通过/haproxy?stats 查看状态。设置 HAProxy更多信息见 this guide ,或 official docs.
使用Ansible部署代码
对于一台服务器我们可以使用如下步骤:
- SSH登录 app1
- cd /var/www/node-hello-world
- git pull 最新代码
- systemctl 重新加载 node-sample 启动应用
如果有多台服务器,就很费力,使用Ansible 可以直接从开发电脑上发布所有服务器。下面是我们部署代码的配置:
- hosts: app
tasks:
- name: update repo
git: repo=https://github.com/dickeyxxx/node-hello-world version=master dest=/var/www/node-hello-world
sudo: yes
sudo_user: web
notify:
- reload node-sample
handlers:
- name: reload node-sample
service: name=node-sample state=reloaded
[app]
192.241.205.146
107.170.233.117
在你开发电脑上运行:(确保安装了Ansible)
ansible-playbook -i production deploy.yml
使用下面配置可以让Ansible为我们实现自动准备provision :
---
- hosts: app
tasks:
- name: Install yum packages
yum: name={{item}} state=latest
with_items:
- git
- vim
- nodejs
- npm
- name: install n (node version installer/switcher)
npm: name=n state=present global=yes
- name: install the latest stable version of node
shell: n stable
- name: Create web user
user: name=web
- name: Create project folder
file: path=/var/www group=web owner=web mode=755 state=directory
- name: Add systemd conf
template: src=systemd.service.j2 dest=/etc/systemd/system/node-sample.service
notify:
- enable node-sample
handlers:
- name: enable node-sample
shell: systemctl enable node-sample
[Service]
WorkingDirectory={{project_root}}
ExecStart=/usr/bin/node boot.js
ExecReload=/bin/kill -HUP $MAINPID
Restart=always
StandardOutput=syslog
StandardError=syslog
SyslogIdentifier={{project_name}}
User=web
Group=web
Environment='NODE_ENV=production'
[Install]
WantedBy=multi-user.target
运行ansible-playbook -i [inventory file] app.yml
这里是适合 负载平衡器的配置.
这里是我们上面所有步骤的GitHub案例,它更新inventory file, 运行准备工作provision 并按照要求部署构建整个应用。