React.JS基础教程
React( ReactJS或React.js) 是一个由Facebook和Instagram在2013年推出用于开发用户界面的开源javascript库包,可以看成是MVC模式中的View视图模式。
React主要目标是瞄准大型应用中界面经常跟随数据变化的场景,React是由Jordan Walke创建,他是一个Facebook的软件工程师,曾经从事基于PHP组件系统XHP开发,React也受到到函数编程思想的影响。
React主要得益于virtual-DOM虚拟DOM的思想,虚拟DOM能够在DOM改变时,分辨出新旧版本DOM的不同,只将DOM中改变的部分进行渲染,这是一种非常有效率的浏览器DOM更新方式。
React的工作原理如下:
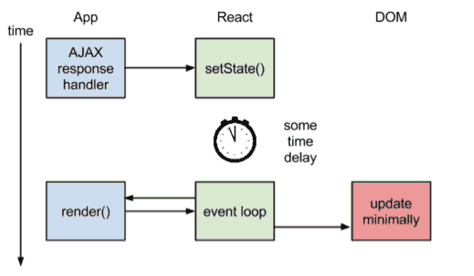
当服务器端将AJAX的响应结果送回客户端浏览器时,会通过React的setState()方法改变浏览器中视图数据,而一个事件循环会监测到状态的改变,触发视图的重新渲染,包括DOM组件树中的更新,由于DOM更新非常耗费性能,引入虚拟DOM则达到最小化的更新量。
下载
在Facebook的http://facebook.github.io/react/下载React.js
页面设置
使用React.js之前,我们要在页面中加载react.js 和JSXTransformer.js, 然后就可以使用javascript编写你的组件了,javascript的type设置为text/jsx:
<!DOCTYPE html>
<html>
<head>
<script src="build/react.js"></script>
<script src="build/JSXTransformer.js"></script>
</head>
<body>
<div id="mount-point"></div>
<script type="text/jsx">
// React代码写在这里
</script>
</body>
</html>
在React中, 组件是绑定安装到每一个元素的, 这样这里我们使用div mount-point作为父容器。
基础概念
React的基本构建块称为组件,如下:
<script type="text/jsx">
/** @jsx React.DOM */
React.render(
<h1>Hello, world!</h1>,
document.getElementById('myDiv')
);
</script>
这段代码你会发现很奇怪, Javascript/HTML混合写在一起,这其实是JSX, 它是一个Javascript XML 语法转换. 这能让你在Javascript中编写类似HTML之类标签,严格来说是基于对象的XML语法,
上面这段语法等同于下没有JSX的代码:
/** @jsx React.DOM */
React.render(
React.DOM.h1(null, 'Hello, world!'),
document.getElementById('myDiv')
);
这里的React.DOM.h1,最后一个是html的h1语法,类似语法有很多,React.DOM.*支持的属性更多见这里。而如果使用JSX,这里是JSX更详细的描述。
组件
前面当我们使用render方法,第一个参数是我们需要渲染的组件,第二个是它应该安装对应的DOM节点,我们能使用createClass方法来创建定制的组件类:
var MyComponent = React.createClass({
render: function(){
return (
<h1>Hello, world!</h1>
);
}
})
上述代码创建好一个类以后,我们就可以render渲染它到我们的文档:
React.render(
<MyComponent/>,
document.getElementById('myDiv')
);
属性
当我们使用我们定义的组件时,我们能增加属性也称为props. 这些属性能在通过this.props在render方法中使用,这样就能渲染输出动态数据:
var MyComponent = React.createClass({
render: function(){
return (
<h1>Hello, {this.props.name}!</h1>
);
}
});
React.render(<MyComponent name="Handsome" />,document.getElementById('myDiv'));
上面就是将MyComponent的属性name的值Handsome动态输出为:<h1>Hello, Handsome!</h1>
React组件需要实现render()方法,这会获得输入数据然后返回需要显示。
下面再看看一个简单的Hello案例。:
var Hello = React.createClass({
render: function () {
return <div>Hello {this.props.name}</div>;
}
});
React.render(<Hello name="World" />, document.body);
该代码中类似XML的语法也就是JSX,下面是没有JSX的React组件实现:
var Hello = React.createClass({displayName: "Hello",
render: function() {
return React.createElement("div", null, "Hello ", this.props.name);
}
});
React.render(React.createElement(Hello, {name: "World"}), mountNode);
React组件除了render以外,还有更多方法:见下面组件规格说明。
render |
render()函数应该是纯粹的函数,也就是说不能改变组件的状态,一般是检查this.props 和 this.state 并返回单个的子元素。 |
getInitialState |
在组件安装前调用一次,这个返回值将用于初始化this.state的值 |
getDefaultProps |
当类被创建时调用一次并被缓存,其得到值将在this.props中设置 |
propTypes |
这个propTypes 对象允许你校验将传送给你组件的props值 |
mixins |
这个mixins数组将允许你使用mixins在多个组件之间分享行为 |
statics |
这个静态对象允许你定义一个在组件类中可被调用的静态方法 |
displayName |
displayName字符串用于调试信息. JSX会自动设置这个值。 |
生命周期
render仅仅是在创建一个组件才需要的方法,有好几个生命周期方法能帮助我们做到更多功能,下表总结了这些方法激活条件。
componentWillMount |
在服务器端和客户端调用一次, 是在初始渲染发生时立即触发调用。 |
componentDidMount |
在初始渲染发生后立即在客户端调用。 |
componentWillReceiveProps |
当一个组件接受到新的prop属性值. 这里使用setState() |
shouldComponentUpdate |
当新的属性值props或状态接受到时,在渲染之前被调用,如果返回false会忽视render() 。 |
componentWillUpdate |
当新的属性值props或状态接受到时,在渲染之前立即被调用,这里不能使用setState()。 |
componentDidUpdate |
在组件的更新被flush到DOM以后立即被调用,这里是用于操作DOM。 |
componentWillUnmount |
当一个组件从DOM中卸装之前,立即被调用。 |
状态和属性
每个组件都有一个状态对象和属性props对象,状态是通过setState方法来设置的,调用setState 会触发UI更新,如果希望在任何互动发生之前设置一个初始化状态,我们使用thegetInitialState方法,见如下:
var MyComponent = React.createClass({
getInitialState: function(){
return {
count: 5
}
},
render: function(){
return (
<h1>{this.state.count}</h1>
)
}
});
除了设置初始状态以外还有更多方法:
setState |
使用当前状态和nextState合并merge |
replaceState |
类似setState(), 但是会删除任何不在nextState中存在的状态key. |
forceUpdate |
调用组件的render(),忽视shouldComponentUpdate() |
React.findDOMNode (0.13+) |
返回对应的原生浏览器DOM元素。 |
isMounted |
如果组件已经被渲染到DOM中,isMounted()返回真 |
setProps |
为了改变属性或触发重新渲染。 |
replaceProps |
类似 setProps()但是会删除先前存在的props属性值,而不是合并两者。 |
再看下面使用上表的更多方法的复杂案例:
<VideoComponent fullscreen={true} />
// props
this.props.fullscreen //=> true
// state
this.setState({ user: 'hemanth' });
this.replaceState({ ... });
this.state.username //=> 'hemanth'
render: function () {
return <div className={this.props.fullscreen ? 'full' : ''}>
Hello, {this.state.username}
</div>;
}
预先导入的状态和属性:
React.createClass({
getInitialState: function () {
return { comments: [] };
},
getDefaultProps: function () {
return { name: "Hello" };
}
);
事件
React也内建一个跨浏览器的事件系统,事件被作为组件的属性携带,能触发方法,让我们再看看计数这个案例:
/** @jsx React.DOM */
var Counter = React.createClass({
incrementCount: function(){
this.setState({
count: this.state.count + 1
});
},
getInitialState: function(){
return {
count: 0
}
},
render: function(){
return (
<div class="my-component">
<h1>Count: {this.state.count}</h1>
<button type="button" onClick={this.incrementCount}>Increment</button>
</div>
);
}
});
React.render(<Counter/>, document.getElementById('mount-point'));
单向数据流
在React中, 应用数据是通过状态和属性props对象实现单向流动, 相比Angular的双向流动,这意味着,在一个多组件层次中,一个普通父组件能管理状态并将其沿着父子链通过props传递
你的状态应该通过setState方法更新,以确保节目刷新,如果必要,结果值应该使用属性被下传到子组件,子组件通过this.props能访问到这个属性。
/** @jsx React.DOM */
var FilteredList = React.createClass({
filterList: function(event){
var updatedList = this.state.initialItems;
updatedList = updatedList.filter(function(item){
return item.toLowerCase().search(
event.target.value.toLowerCase()) !== -1;
});
this.setState({items: updatedList});
},
getInitialState: function(){
return {
initialItems: [
"Apples",
"Broccoli",
"Chicken",
"Duck",
"Eggs",
"Fish",
"Granola",
"Hash Browns"
],
items: []
}
},
componentWillMount: function(){
this.setState({items: this.state.initialItems})
},
render: function(){
return (
<div className="filter-list">
<input type="text" placeholder="Search" onChange={this.filterList}/>
<List items={this.state.items}/>
</div>
);
}
});
var List = React.createClass({
render: function(){
return (
<ul>
{
this.props.items.map(function(item) {
return <li key={item}>{item}</li>
})
}
</ul>
)
}
});
React.render(<FilteredList/>, document.getElementById('mount-point'));
AJAX请求
React 默认情况并不提供一个帮助方法管理AJAX请求,但是你能使用其他Javascript库包比如JQuery或Zepto进行必要的AJAX请求。下面是基于props.url进行AJAX请求,成功返回后设置数据状态:
componentDidMount: function() {
$.ajax({
url: this.props.url,
dataType: 'json',
cache: false,
success: function(data) {
this.setState({data: data});
}.bind(this),
error: function(xhr, status, err) {
console.error(this.props.url, status, err.toString());
}.bind(this)
});
}
组件内的Style样式
在React并不是使用传统的内联CSS字符串指定Style样式,而是指定每个Style作为一个对象,其key是style名称的camelCased版本,其值是style的值字符串。
var divStyle = {
color: 'white',
backgroundImage: 'url(' + imgUrl + ')',
WebkitTransition: 'all', // note the capital 'W' here
msTransition: 'all' // 'ms' is the only lowercase vendor prefix
};
React.render(<div style={divStyle}>Hello World!</div>, mountNode);
Style属性中如果有数字,将会自动加上"px",比如“width: 10”读成“width: 10px”,这里列出不会获得自动PX后最的属性列表:
-
boxFlex
-
boxFlexGroup
-
columnCount
-
fillOpacity
-
flex
-
flexGrow
-
flexPositive
-
flexShrink
-
flexNegative
-
fontWeight
-
lineClamp
-
lineHeight
-
opacity
-
order
-
orphans
-
strokeOpacity
-
widows
-
zIndex
-
zoom
如何访问DOM?
下面是根据引用访问DOM节点:
<input ref="firstName">
this.refs.firstName
React.findDOMNode(this.refs.firstName).focus()
React.findDOMNode(this.refs.firstName).value
DOM Events: Helps to handle DOM events.
<input type="text" value={this.state.value} onChange={this.handleChange} />
handleChange: function(event) {
this.setState({ value: event.target.value });
}
使用Mixin进行两边数据绑定的方式:
Email: <input type="text" valueLink={this.linkState('email')} />
React.createClass({
mixins: [React.addons.LinkedStateMixin]
});
this.state.email
校验属性
Primitive types初始类型: .string, .number, .func, and .bool.
React 元素: .element, .node.
Enumerables: .oneOf, .oneOfType.
数组Arrays和对象objects: array[Of], .object[Of], .instanceOf, .shape.
使用方法:
React.createClass({
propTypes: {email: React.PropTypes.string, firstName: React.PropTypes.string, age: React.PropTypes.number, gender: React.PropTypes.oneOf(['M','F','NA'])
node: React.PropTypes.node, cb: React.PropTypes.func.isRequired,
}
});
创建你自己的Mixin:
var TimeOutMixin = {
componentWillMount: function() { .. }
}
var TickTock = React.createClass({
mixins: [TimeOutMixin]
}
下面是在Javascript 6中React用法(React on ES2015/ES6):
Classes
class Animal extends React.Component {
render() {
return <img alt={this.props.name} src={this.props.src} />;
}
}
属性初始化:
var Video = React.createClass({
getDefaultProps: function() {
return {
autoPlay: false,
maxLoops: 10,
};
},
getInitialState: function() {
return {
loopsRemaining: this.props.maxLoops,
};
},
propTypes: {
autoPlay: React.PropTypes.bool.isRequired,
maxLoops: React.PropTypes.number.isRequired,
posterFrameSrc: React.PropTypes.string.isRequired,
videoSrc: React.PropTypes.string.isRequired,
},
});
箭头函数:
class PostInfo extends React.Component {
handleOptionsButtonClick = (e) => {
this.setState({showOptionsModal: true});
}
}
使用模板字符串的动态属性名:
class Form extends React.Component {
onChange(inputName, e) {
this.setState({
[`${inputName}Value`]: e.target.value,
});
}
}
Destructuring & spread attribute:
class AutoloadingPostsGrid extends React.Component {
render() {
var {
className,
...others, // all properties of this.props except for className
} = this.props;
return <PostsGrid {...others} />
}
}
CoffeeScript and React [React v0.13.0+]:
div = React.createFactory 'div'
class Counter extends React.Component
@propTypes = initialCount: React.PropTypes.number
@defaultProps = initialCount: 0
constructor: (props) ->
super props
@state = count: props.initialCount
tick: =>
@setState count: @state.count + 1
render: ->
div onClick: @tick,
'Clicks: '
@state.count
现在我们已经学习了一些React基本概念,可以花更多时间了解 React API 以及有关JSX.
前端Flux架构简介
什么是Redux?