Spring Cloud Gateway WebFilter工厂 | Baeldung


Spring Cloud Gateway是微服务中经常使用的智能代理服务。它透明地将请求集中在单个入口点中,并将其路由到适当的服务。它的一个最有趣的特点是概念过滤器(网页过滤或GatewayFilter)。
WebFilter与谓词工厂一起,包含完整的路由机制。Spring Cloud Gateway提供了许多内置的WebFilter工厂,这些工厂允许在到达代理服务之前与HTTP请求进行交互,并在将结果传递给客户端之前与HTTP响应进行交互。也可以实现自定义过滤器

在本教程中,我们将重点介绍项目中包含的内置WebFilter工厂以及如何在高级用例中使用它们。

2. WebFilter工厂
网页过滤(或GatewayFilter)工厂允许修改所述入站HTTP请求和出站HTTP响应。从这个意义上讲,它提供了一组有趣的功能,可以在与下游服务交互之前和之后应用。

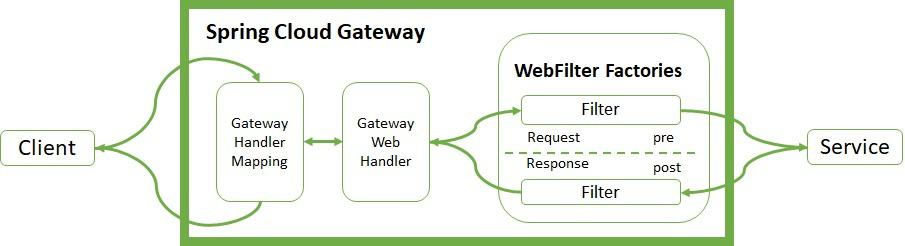
处理程序会映射管理客户端的请求。检查请求是否与某些已配置的路由匹配。然后,将请求发送到Web处理程序以执行此路由的特定筛选器链。虚线在前置和后置滤波器逻辑之间划分逻辑。前置过滤器在代理请求之前运行。后置过滤器收到代理响应后便开始起作用。筛选器提供了在两者之间修改流程的机制。

3.实施WebFilter工厂
让我们回顾一下Spring Cloud Gateway项目中包含的最重要的WebFilter工厂。有两种方法可以实现它们,即使用YAML或Java DSL。我们将展示有关如何同时实现这两个示例。

3.1:HTTP请求
内置的WebFilter工厂允许与HTTP请求的标头和参数进行交互。我们可以添加标头值(AddRequestHeader), 映射标头值(MapRequestHeader),设置或替换标头值 (SetRequestHeader)  或删除标头值 (RemoveRequestHeader),并将其发送到代理服务。原始主机标头也可以保留(PreserveHostHeader)。
同样,我们可以添加请求参数 (AddRequestParameter)和删除请求参数 (RemoveRequestParameter),以供下游服务处理。让我们看看如何做:

- id: add_request_header_route
  uri: https://httpbin.org
  predicates:
  - Path=/get
/**
  filters:
  - AddRequestHeader=My-Header-Good,Good
  - AddRequestHeader=My-Header-Remove,Remove
  - AddRequestParameter=var, good
  - AddRequestParameter=var2, remove
  - MapRequestHeader=My-Header-Good, My-Header-Bad
  - MapRequestHeader=My-Header-Set, My-Header-Bad
  - SetRequestHeader=My-Header-Set, Set 
  - RemoveRequestHeader=My-Header-Remove
  - RemoveRequestParameter=var2


让我们检查一切是否按预期进行:

$ curl http://localhost:8080/get
{
  "args": {
    "var": "good"
  },
  "headers": {
    "Host": "localhost",
    "My-Header-Bad": "Good",
    "My-Header-Good": "Good",
    "My-Header-Set": "Set",
  },
  "origin": "127.0.0.1, 90.171.125.86",
  "url": "https://localhost:8080/get?var=good"
}

结果增加了My-Header-Good 、My-Header-Bad、My-Header-Set等标头值。在args和url部分中,我们可以看到添加了一个新参数var。此外,最后一个过滤器将删除var2参数。
此外,我们可以在到达代理服务之前修改请求正文。只能使用Java DSL表示法配置此过滤器。下面的代码段仅将响应正文的内容大写,下面是使用https://httpbin.org/测试:

@Bean
public RouteLocator routes(RouteLocatorBuilder builder) {
     return builder.routes()
       .route("modify_request_body", r -> r.path("/post/**")
         .filters(f -> f.modifyRequestBody(
           String.class, Hello.class, MediaType.APPLICATION_JSON_VALUE, 
           (exchange, s) -> Mono.just(new Hello(s.toUpperCase()))))
         .uri("https://httpbin.org"))
       .build();
}

要测试代码段,让我们使用-d选项执行curl ,看看内容是否有“ Content”:

$ curl -X POST "http://localhost:8080/post" -i -d "Content"
"data": "{\"message\":\"CONTENT\"}",
"json": {
    "message": "CONTENT"
}

我们可以看到,由于过滤器的原因,内容现在为大写CONTENT。

3.2:HTTP响应
同样,我们可以通过使用add(AddResponseHeader),设置或替换(SetResponseHeader),删除(RemoveResponseHeader)和重写(RewriteResponseHeader)来修改响应头。响应上的另一个功能是重复数据删除(DedupeResponseHeader)可以覆盖策略并避免重复。通过使用另一个内置工厂(RemoveLocationResponseHeader),我们可以摆脱有关版本,位置和主机的特定于后端的详细信息。

- id: response_header_route
  uri: https://httpbin.org
  predicates:
  - Path=/header/post/**
  filters:
  - AddResponseHeader=My-Header-Good,Good
  - AddResponseHeader=My-Header-Set,Good
  - AddResponseHeader=My-Header-Rewrite, password=12345678
  - DedupeResponseHeader=Access-Control-Allow-Credentials Access-Control-Allow-Origin
  - AddResponseHeader=My-Header-Remove,Remove
  - SetResponseHeader=My-Header-Set, Set
  - RemoveResponseHeader=My-Header-Remove
  - RewriteResponseHeader=My-Header-Rewrite, password=[^&]+, password=***
  - RewriteLocationResponseHeader=AS_IN_REQUEST, Location, ,

让我们使用curl显示响应头:

$ curl -X POST "http://localhost:8080/header/post" -s -o /dev/null -D -
HTTP/1.1 200 OK
My-Header-Good: Good
Access-Control-Allow-Origin: *
Access-Control-Allow-Credentials: true
My-Header-Rewrite: password=***
My-Header-Set: Set

与HTTP请求类似,我们可以修改响应正文。在此示例中,我们覆盖了PUT响应的主体:

@Bean
public RouteLocator responseRoutes(RouteLocatorBuilder builder) {
    return builder.routes()
      .route("modify_response_body", r -> r.path("/put/**")
        .filters(f -> f.modifyResponseBody(
          String.class, Hello.class, MediaType.APPLICATION_JSON_VALUE, 
          (exchange, s) -> Mono.just(new Hello("New Body"))))
        .uri("https://httpbin.org"))
      .build();
}

让我们使用PUT端点来测试功能:

$ curl -X PUT "http://localhost:8080/put" -i -d "CONTENT"
{"message":"New Body"}

3.3:路径
内置WebFilter工厂提供的功能之一是与客户端配置的路径进行交互。可以设置其他路径(SetPath),重写(RewritePath),添加前缀(PrefixPath)和剥离(StripPrefix)以仅提取其中的一部分。请记住,过滤器是根据其在YAML文件中的位置顺序执行的。让我们看看如何配置路由:

- id: path_route
  uri: https://httpbin.org
  predicates:
  - Path=/new/post/**
  filters:
  - RewritePath=/new(?<segment>/?.*), $\{segment}
  - SetPath=/post

两个过滤器在到达代理服务之前都删除子路径/ new。让我们执行curl:

$ curl -X POST "http://localhost:8080/new/post" -i
"X-Forwarded-Prefix": "/new"
"url": "https://localhost:8080/post"

我们也可以使用StripPrefix工厂。通过StripPrefix = 1, 我们可以在联系下游服务时摆脱第一个子路径。

3.4:与HTTP状态有关
RedirectTo具有两个参数:status和URL。状态必须是一系列300重定向HTTP代码,而URL必须是有效的。SetStatus 采用一个参数状态,该状态可以是HTTP代码或其字符串表示形式。让我们看几个例子:

- id: redirect_route
  uri: https://httpbin.org
  predicates:
  - Path=/fake/post/**
  filters:
  - RedirectTo=302, https://httpbin.org
- id: status_route
  uri: https://httpbin.org
  predicates:
  - Path=/delete/**
  filters:
  - SetStatus=401

第一个过滤器作用于/ fake / post路径,并且客户端以HTTP状态302 重定向到https://httpbin.org:

$ curl -X POST "http://localhost:8080/fake/post" -i
HTTP/1.1 302 Found
Location: https://httpbin.org

第二个过滤器检测到/ delete路径,并设置了HTTP状态401:

$ curl -X DELETE "http://localhost:8080/delete" -i
HTTP/1.1 401 Unauthorized

3.5:请求大小限制
最后,我们可以限制请求的大小限制(RequestSize)。如果请求大小超出限制,则网关拒绝访问该服务:

- id: size_route
  uri: https://httpbin.org
  predicates:
  - Path=/anything
  filters:
  - name: RequestSize
    args:
       maxSize: 5000000

高级用例包括Spring Cloud Gateway提供了其他高级WebFilter工厂,以支持微服务模式的基准功能。例如断路器、重试、保存会话并保护标头以及请求速率限制器。点击标题见原文高级用例详情