在本文中,我们将研究Spring安全角色和特权以及如何使用此功能来构建您的应用程序。
企业应用程序包含多个部分,它不允许所有用户访问整个应用程序。我们可能会提出一些要求,即我们希望根据用户角色和特权提供对应用程序的访问。让我们以管理电子商务商店的简单后端应用程序为例。
- 具有ADMIN角色的用户将具有执行任何操作的完全权限。
- 客户服务代理可以读取客户和订单信息,但看不到其他选项。
- 产品经理只能看到更新/创建产品的选项。
Spring安全性使使用角色和特权来构建这些类型的规则变得更加容易。我们可以在注册/创建过程中为用户分配角色和特权以及这些角色。在本文中,我们将了解如何使用Spring安全角色和特权功能来处理此类用例。为了确保我们有共同的理解,让我们看几个重要的术语。
- Role角色:角色代表了系统的高级别角色(例如ADMIN,MANAGER等),每个角色都可以具有低级别的权限。
- Privileges 权限:权限定义角色的低级权限(例如,ADMIN可以读取/写入/删除,但MANAGER只能读取/编辑)
可以从GitHub Repository下载完整的应用程序。
1.数据库设计
设计spring安全角色和权限的方法有多种,但是最常见和灵活的方法之一是围绕用户组构建角色和特权模块。作为任何应用程序的一部分,将用户分为几类,让我们以下面的示例为例,以便更好地理解:
- 前端用户应转到“CUSTOMER组”。
- 后端用户可以EMPLOYEE分组。
- 我们可以创建支持用户的另一个变体(例如ADMIN,MANAGER等等)
我们将使用相同的应用程序概念。应用程序的每个用户都将属于某个组,我们将使用这些组来驱动角色和权限。这是我们的应用程序的数据库设计。
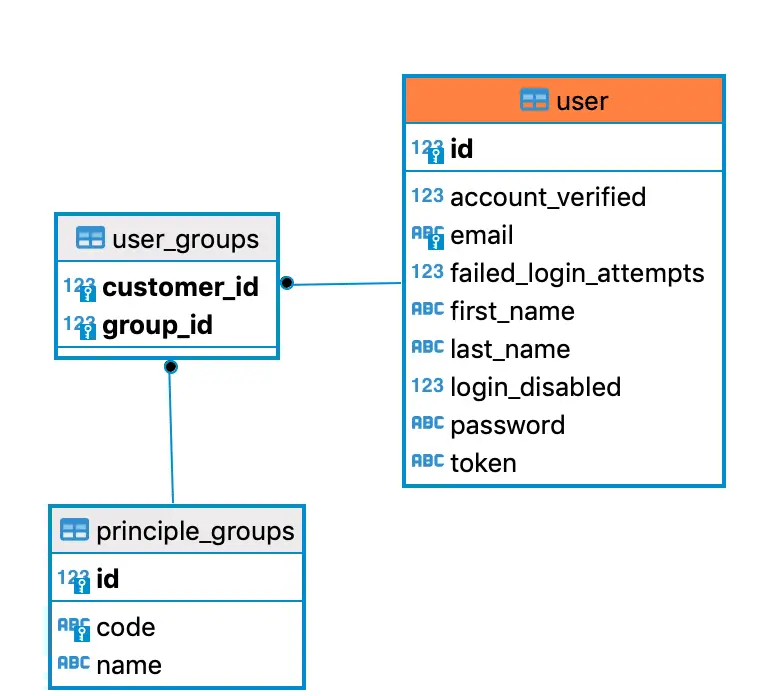
- 每个用户都属于某个组。
- 组将在注册/创建时分配给用户。
- principle_group 定义系统中所有可用的组(例如客户,管理员等)
UserGoup实体:
@Entity
@Table(name = "principle_groups")
public class Group{

    //removed getter and setter to save space
    @Id
    @GeneratedValue(strategy = GenerationType.IDENTITY)
    private Long id;

    @Column(unique = true, nullable = false)
    private String code;
    private String name;

    @ManyToMany(mappedBy = "userGroups")
    private Set<UserEntity> users;
}
|
Group是一个简单的JPA实体,并包含了组名称和代码信息。有趣的部分是@ManyToMany与User实体的关系。这种多对多关系将为我们创建另一个数据库表UserEntity重点是与Group实体的关系。
@Entity
@Table(name = "user")
public class UserEntity {

    @Id
    @GeneratedValue(strategy = GenerationType.IDENTITY)
    private Long id;
    private String firstName;
    private String lastName;
    @Column(unique = true)
    private String email;
    private String password;
    private String token;
    private boolean accountVerified;
    private int failedLoginAttempts;
    private boolean loginDisabled;

    @OneToMany(mappedBy = "user")
    private Set<SecureToken> tokens;

    @ManyToMany(cascade = {
            CascadeType.PERSIST,
            CascadeType.MERGE
    })
    @JoinTable(name = "user_groups",
            joinColumns =@JoinColumn(name = "customer_id"),
            inverseJoinColumns = @JoinColumn(name = "group_id"
    ))
    private Set<Group> userGroups= new HashSet<>();

    public Set<Group> getUserGroups() {
        return userGroups;
    }

    public void setUserGroups(Set<Group> userGroups) {
        this.userGroups = userGroups;
    }
}
|
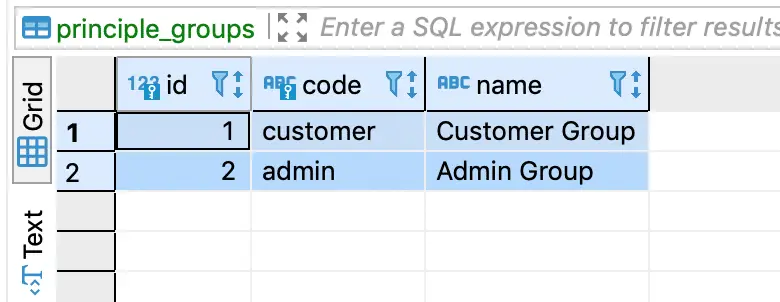
我们可以根据您的要求将数据填充到principal_groups表中。我们将填充以下2组:
- 顾客
- 行政
2.向用户添加组
分配给用户的组上派生spring安全角色和权限。让我们更改注册过程,以将用户组分配给用户。我们将对我们的DefaultUserService内容进行微小的更改。在注册过程中,我们会将组添加到用户个人资料中。
@Service("userService")
public class DefaultUserService implements UserService{

    @Autowired
    private UserRepository userRepository;

    @Autowired
    UserGroupRepository groupRepository;

    @Override
    public void register(UserData user) throws UserAlreadyExistException {
        if(checkIfUserExist(user.getEmail())){
            throw new UserAlreadyExistException("User already exists for this email");
        }
        UserEntity userEntity = new UserEntity();
        BeanUtils.copyProperties(user, userEntity);
        encodePassword(user, userEntity);
        updateCustomerGroup(userEntity);
        userRepository.save(userEntity);
        sendRegistrationConfirmationEmail(userEntity);

    }

    private void updateCustomerGroup(UserEntity userEntity){
        Group group= groupRepository.findByCode("customer");
        userEntity.addUserGroups(group);
    }
}
|
您始终可以根据需要更改组分配逻辑。我们甚至可以在后端系统中构建逻辑以将组分配给用户。
3.自定义UserDetailsService实现
UserDetailsService是Spring Security框架中的类,是用来检索用户的身份验证和授权信息的核心接口。该接口还负责提供用户GrantedAuthority列表,该列表用于为用户派生我们的spring安全角色和权限。让我们实现spring security的自定义UserDetailsService,以返回GrantedAuthority基于用户组的列表。@Service("userDetailsService")
@Transactional
public class CustomUserDetailService implements UserDetailsService{
@Autowired
UserRepository userRepository;
@Override
public UserDetails loadUserByUsername(String email) throws UsernameNotFoundException {
final UserEntity customer = userRepository.findByEmail(email);
if (customer == null) {
throw new UsernameNotFoundException(email);
}
boolean enabled = !customer.isAccountVerified(); // we can use this in case we want to activate account after customer verified the account
UserDetails user = User.withUsername(customer.getEmail())
.password(customer.getPassword())
.disabled(customer.isLoginDisabled())
.authorities(getAuthorities(customer)).build()
;
return user;
}
private Collection<GrantedAuthority> getAuthorities(UserEntity user){
Set<Group> userGroups = user.getUserGroups();
Collection<GrantedAuthority> authorities = new ArrayList<>(userGroups.size());
for(Group userGroup : userGroups){
authorities.add(new SimpleGrantedAuthority(userGroup.getCode().toUpperCase()));
}
return authorities;
}
}
|
这里有趣的事情是我们如何构建GrantedAuthority实体。我们使用一种简单的逻辑来构建GrantedAuthority与分配的用户组相同的列表。您可以更改/自定义逻辑以构建更复杂的GrantedAuthorities。
4. Spring Security Authority映射
通过UserDetailsService实现子类,我们可以开始通过hasAnyAuthority()或hasAuthority()方法使用授权处理UI上的数据信息可见性。让我们看一下修改后的spring安全配置。
@Override
protected void configure(HttpSecurity http) throws Exception {
    http.authorizeRequests()
            .antMatchers("/login", "/register","/home")
            .permitAll()
            .antMatchers("/account/**").hasAnyAuthority("CUSTOMER", "ADMIN")
            .and()
            ...
}
|
看着上面的配置中,我们告诉Spring security,只允许CUSTOMER和ADMIN权限用户访问 /account/**,注意用户授权是由UserDetailsService提供。您也可以使用相同的选项根据用户角色来显示/隐藏链接。这里将Spring安全性与Thymeleaf结合使用的示例代码。<ul class="navbar-nav ml-auto">
<li class="dropdown user user-menu" sec:authorize="hasAnyAuthority('CUSTOMER', 'ADMIN')">
<a href="#" class="dropdown-toggle" data-toggle="dropdown" aria-expanded="false">
<span class="hidden-xs" sec:authentication="name"></span>
</a>
<ul class="dropdown-menu">
<li class="user-header">
<img th:src="@{/dist/img/avatar5.png}" class="img-circle" alt="User Image">
<p>
Spring Security Course
<small>Java Development Journal</small>
</p>
</li>
<li class="user-footer">
<div class="pull-right">
<a href="javascript: document.logoutForm.submit()" class="btn btn-default btn-flat">Sign out</a>
</div>
</li>
</ul>
</li>
<form name="logoutForm" th:action="@{/logout}" method="post" th:hidden="true">
<input hidden type="submit" value="Sign Out"/>
</form>
</ul>
|