在这篇博客中,我们将使用命令和查询责任分离(CQRS) +存储库模式建立领域驱动设计(DDD)架构,在docker的帮助下,我们使这个应用程序 dockerize 使用docker-compose.yml
DDD + CQRS + 存储库+ NEST + DOCKER
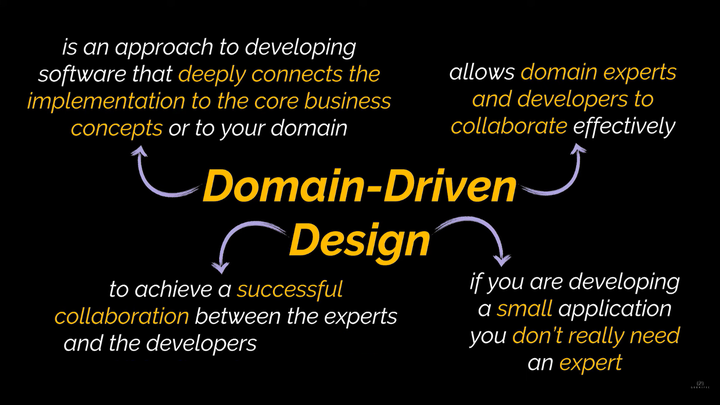
什么是领域驱动设计?
这个问题很难准确地回答和解释,如果不是这样,Eric Evans 在 2003 年就不需要写一本 500 多页的书了。
我们的软件设计是由我们所谓的领域驱动的,那么在这种情况下究竟什么是领域?
假设我们正在开发一个允许我们订购东西的应用程序,那么我们的应用程序的主题将是在线购物或在线订单处理,正在开发的应用程序所围绕的主题区域称为域。
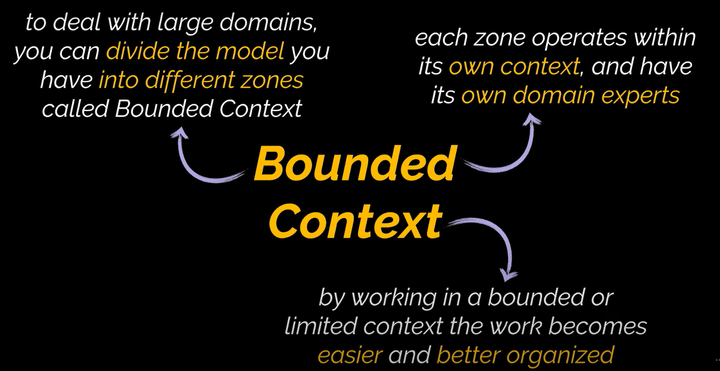
了解我们的应用程序应用的上下文总是很好的,因为有时同一公司或组织可以同时活跃在多个领域,如购物、交付和运输维修,或者有时您想到的领域可能是非常广泛或非特定的食物,但在食品行业中究竟是什么。
例如,一个处理食品的组织可以分为一个销售部门和一个配送部门,每个部门都在自己的环境上下文中运作,每个部门都有自己的领域专家,因此他们不必相互交互。
通过查看上面的图片,我知道这听起来可能很复杂,但练习 DDD 的目标是以领域专家和开发人员都可以有效协作的方式处理复杂的场景。
DDD架构的项目结构:
src folder
 - config folder
 - database folder
 - errors folder
 - middlewares folder
 - models folder
 - repositories folder
 - routes folder
 - services folder
|
源码项目
什么是命令查询职责分离(CQRS)
CQRS 或命令查询职责分离可能是您已经使用了很长时间但您不知道它有一个名称的东西之一,这是将读取与写入分离的基本思想。 这个基本定义或想法是 “您不必使用单个服务来托管您的读写工作者,或者您甚至不必使用单个数据库来托管您的写入和读取。
没有 CQRS:
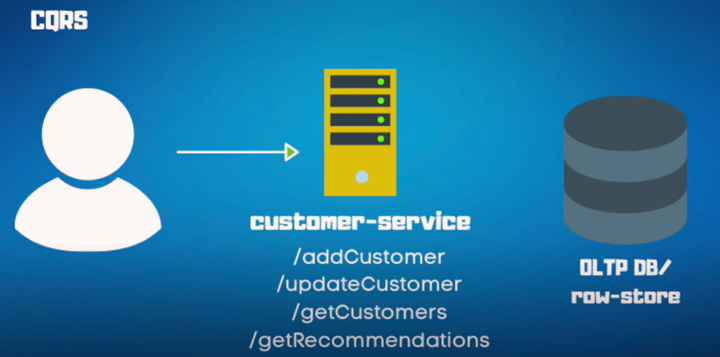
上图是正常的 MVC 结构
在没有隔离的情况下,您拥有一个具有许多端点的客户服务,您可以添加客户、获取客户、更新客户和后端服务回击在线事务数据库的 oltp,因此您正在使用关系数据库,它是行存储,因为您正在编写并且针对写入进行了优化。
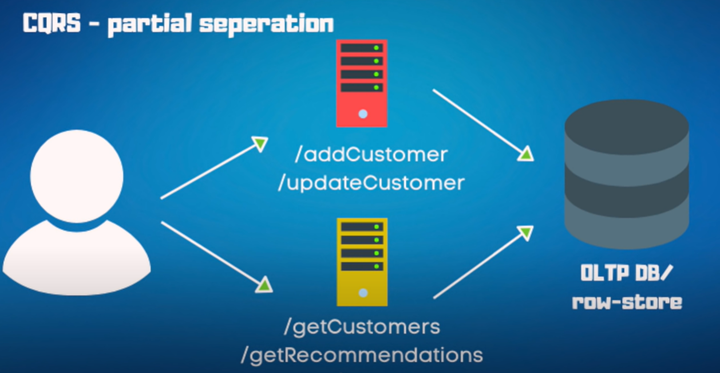
上图是部分分离
如果您进行部分分离,这将是看起来的样子,因为我们正在添加客户和更新客户,让我们把它放到另一个服务中,让我们把获取客户推荐和斜线总数放在一个完全不同的服务中,这就是我们一直在做的事情很长一段时间你可以从读中分开写有什么好处,添加客户和更新客户的人,数据库的后端连接池应该只使用具有写权限的数据库用户,第二个服务将获得一个简单的用户基本的读取权限,这样您就可以获得很好的安全性和好处,或者您可以像这样进行完全分离
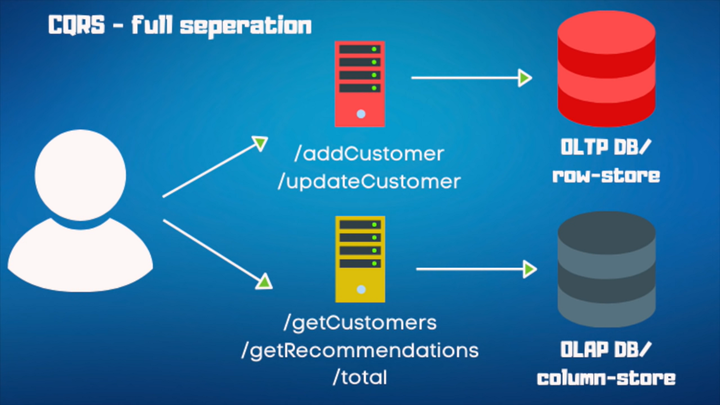
上图是完全隔离
CQRS 的缺点是什么:
它与今天的微服务的缺点非常相似,它的复杂性,当你开始强制分离事物时,并不意味着它们本质上自然适合这种分离。 Martin Fowler 在这篇博客中很好地解释了这一点:
嘿,伙计们,在 2011 年之前,我知道 CQRS 听起来不错,但有时您的工作量只是正常的杂物(创建读取更新删除),所以就这样吧。 如果您不需要分离事物,因为分离它的耦合较少,但它引入了复杂性,因为现在您拥有曾经生活在一起的事物,现在您将它们强行分离。
什么是存储库模式:
存储库模式是一种抽象数据访问的策略。
这就像在您的应用程序和数据之间放置一个通用适配器,因此您使用什么数据存储技术并不重要。您的应用程序想要的只是对项目进行定义操作,它不必关心它的存储方式或来源。
设置项目:
安装 Nestjs Cli 并创建 Nest js 项目文件夹
$ npm i -g @nestjs/cli
$ nest new project-name
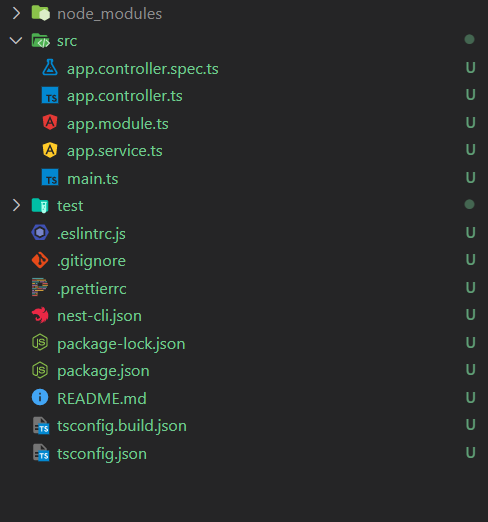
|
现在你有了这种项目结构:
现在安装您将获得这种类型的结构
$ npm install --save @nestjs/cqrs
在 src 中创建这些entities, database, config, modules,文件夹,现在在在entities文件夹中创建文件Account.entity.ts
SQL 脚本文件将在 repo 中提供,您可以从那里下载它在您的 SQL 上运行它,您的所有表都将被创建。
Account.entity.ts:
import { Column, Entity, PrimaryGeneratedColumn } from 'typeorm';

@Entity('hk_accounts')
export class Accountss {

    @PrimaryGeneratedColumn()
    id: string;

    @Column({ name: 'account_id', type: 'bigint', nullable: true })
    account_id: number;

    @Column({ name: 'consumer_id', type: 'bigint', nullable: true })
    consumer_id: number;

    @Column({ name: 'account_nature', nullable: true })
    account_nature: number;

    @Column({ name: 'account_type', nullable: true })
    account_type: string;

    @Column({ name: 'active', nullable: true })
    active: number;

    @Column({ name: 'balance_amount', nullable: true })
    balance_amount: number;

    @Column({ name: 'box_color', nullable: true })
    box_color: string;

    @Column({ name: 'box_icon', nullable: true })
    box_icon: string;

    @Column({ name: 'description', nullable: true })
    description: string;

    @Column({ name: 'flex1', nullable: true })
    flex1: string;

    @Column({ name: 'flex2', nullable: true })
    flex2: string;

    @Column({ name: 'flex3', nullable: true })
    flex3: string;

    @Column({ name: 'flex4', nullable: true })
    flex4: string;

    @Column({ name: 'flex5', nullable: true })
    flex5: string;

    @Column({ name: 'flex6', nullable: true })
    flex6: string;

    @Column({ name: 'gl_account_no', nullable: true })
    gl_account_no: string;

    @Column({ name: 'title', nullable: true })
    title: string;

    @Column({ name: 'opening_balance', nullable: true })
    opening_balance: number;

    @Column({ name: 'record_created_on', nullable: true })
    record_created_on: Date;

    @Column({ name: 'is_sync', nullable: true })
    is_sync: number;

    @Column({ name: 'device_type', nullable: true })
    device_type: string;

    @Column({ name: 'bank_name', nullable: true })
    bank_name: string;

    @Column({ name: 'sys_defined', nullable: true })
    sys_defined: number;

    @Column({ name: 'net_amount_total', nullable: true })
    net_amount_total: number;
}
|
另外,在database文件夹中创建database.module.ts, db.error.ts,db.interface.ts
db.interface.ts:
import { ConnectionOptions } from 'typeorm';

/**
 * Contains configuration options for the TypeORM database.
 * Note that connection details, such as host and credentials, come from the environment variables, via the main config.
 */
export interface DbConfig {
    entities: ConnectionOptions['entities'];
}
|
db.error.ts:
export class DbError extends Error {
    public constructor(message = 'Unknown database error') {
        super(message);
    }
}

// tslint:disable-next-line: max-classes-per-file
export class DbConfigError extends DbError {
    public constructor(message = 'Database configuration error') {
        super(message);
    }
}
|
database.module.ts:
import { Module, DynamicModule } from '@nestjs/common';
import { TypeOrmModule, TypeOrmModuleOptions } from '@nestjs/typeorm';
import { ConfigDBData } from '../config/config.interface';
import { ConfigModule } from '../config/config.module';
import { ConfigService } from '../config/config.service';
import { DbConfig } from './db.interface';
import { DbConfigError } from './db.error';

@Module({})
export class DatabaseModule {
    static forRoot(dbconfig: DbConfig): DynamicModule {
        return {
            global: true,
            module: DatabaseModule,
            imports: [
                TypeOrmModule.forRootAsync({
                    imports: [ConfigModule],
                    useFactory: (configService: ConfigService) =>
                        DatabaseModule.getConnectionOptions(configService, dbconfig),
                    inject: [ConfigService],
                }),
            ],
        };
    }

    static forRootEvent(dbconfig: DbConfig): DynamicModule {
        return {
            global: true,
            module: DatabaseModule,
            imports: [
                TypeOrmModule.forRootAsync({
                    name: 'event_store',
                    imports: [ConfigModule],
                    useFactory: (configService: ConfigService) =>
                        DatabaseModule.getConnectionEventStoreOptions(configService, dbconfig),
                    inject: [ConfigService],
                }),
            ],
        };
    }

    public static getConnectionOptions(config: ConfigService, dbconfig: DbConfig): TypeOrmModuleOptions {
        const dbdata = config.get().db;
        let connectionOptions: TypeOrmModuleOptions;

        if (!dbdata) {
            throw new DbConfigError('Database config is missing');
        }
        connectionOptions = this.getConnectionOptionsMssql(dbdata);

        return {
            ...connectionOptions,
            entities: dbconfig.entities,
            logging: true,
            extra: {
                "validateConnection": false,
                "trustServerCertificate": true
            }
        };
    }

    public static getConnectionEventStoreOptions(config: ConfigService, dbconfig: DbConfig): TypeOrmModuleOptions {
        const dbdata = config.getEventConfig().db;
        let connectionOptions: TypeOrmModuleOptions;

        if (!dbdata) {
            throw new DbConfigError('Database config is missing');
        }
        connectionOptions = this.getConnectionOptionsMssql(dbdata);
        return {
            ...connectionOptions,
            entities: dbconfig.entities,
            logging: true,
            extra: {
                "validateConnection": false,
                "trustServerCertificate": true
            }
        };
    }

    private static getConnectionOptionsMssql(dbdata: ConfigDBData): TypeOrmModuleOptions {
        return {
            type: 'mssql',
            host: process.env.MSSQL_DB_HOST || dbdata.host,
            port: +process.env.MSSQL_DB_PORT || dbdata.port,
            username: process.env.MSSQL_USER || dbdata.user,
            password: process.env.MSSQL_PASSWORD || dbdata.pass,
            database: process.env.MSSQL_DB || dbdata.name,
        };
    }
}
|
在app.module 添加这些代码行。
app.module.ts:
import { Module, ValidationPipe } from '@nestjs/common';
import { AppController } from './app.controller';
import { AppService } from './app.service';
import { APP_PIPE } from '@nestjs/core';
import { ConfigModule as EnvConfigModule } from '@nestjs/config';
import { AccountModule } from './modules/Account/Account.module';
import { ConfigModule } from './config/config.module';
import { DatabaseModule } from './database/database.module';
import { entitiesList } from './entities.list';

@Module({
  imports: [EnvConfigModule.forRoot(),
    //DB config
    ConfigModule,

  // Module listing
  DatabaseModule.forRoot({ entities: entitiesList }),
    AccountModule
  ],
  controllers: [AppController],
  providers: [AppService,
    {
      provide: APP_PIPE,
      useValue: new ValidationPipe({
        whitelist: true,
        transformOptions: {
          enableImplicitConversion: true
        }
      }),
    }],
})
export class AppModule { }
|
并在entities.list.ts文件中添加这些代码行:
import { Accountss } from "./entities/Account.entity";

const entitiesList = [Accountss];

export { entitiesList };
|
现在在 config 文件夹中config.default.ts创建以下文件config.interface.ts、config.module.ts、config.service.ts
这些源码见github
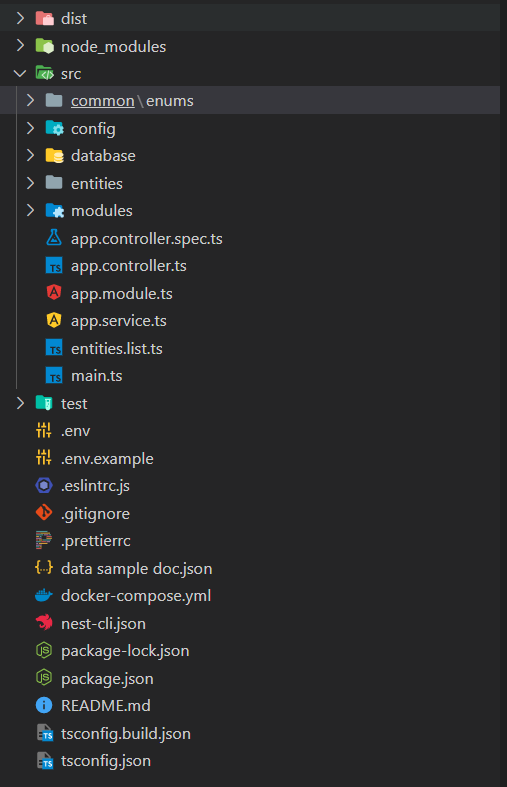
现在在public文件夹中创建文件夹枚举,并在枚举文件夹中创建status-codes.ts和response-wrapper.ts文件
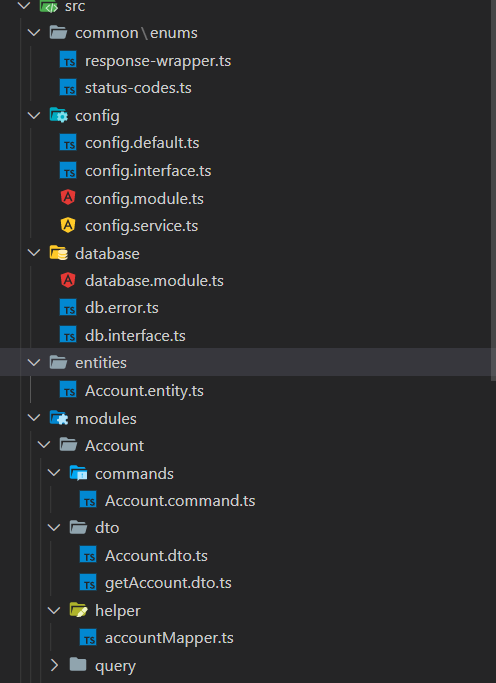
项目结构如下:
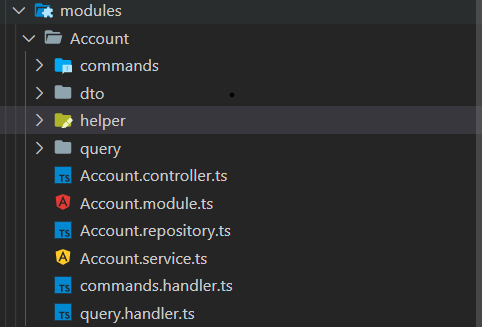
现在在模块文件夹中创建Account文件夹。在Account文件夹中创建Commands,dto,helper和query文件夹,同时在Account文件夹中创建Account.controller.ts,Account.module.ts,Account.repository.ts,Account.service.ts,commands.handler.ts,query.handler.ts,正如你在上面的图片中看到的,你的项目结构应该如上图所示。
Account.controller.ts:我们在其中创建 API,一个用于 POST(写入),一个用于 GET(读取),您可以通过阅读Account.controller.ts代码来理解事情我相信您已经知道 Nest js 是如何工作的,现在Account.service.ts我们添加以下代码。
import { Injectable } from '@nestjs/common';
import { CommandBus, QueryBus } from '@nestjs/cqrs';
import { AccountCommand } from './commands/Account.command';
import { AccountDto } from './dto/Account.dto';
import { GetAccountDto } from './dto/getAccount.dto';
import { GetAccountQuery } from './query/get-account.query';

@Injectable()
export class AccountService {

  constructor(
    private readonly commandBus: CommandBus,
    private readonly queryBus: QueryBus,
  ) { }
  async CreateAccountServiceHandler(AccountDto: AccountDto) {
    return await this.commandBus.execute(
      new AccountCommand(AccountDto),
    );
  }

  async getAccountServiceHandler(GetAccountDto: GetAccountDto) {
    return await this.queryBus.execute(
      new GetAccountQuery(GetAccountDto),
    );
  }


}
|
我们正在命令总线中创建命令或创建对象,这取决于您,我们将此命令发送到此命令总线。Command 只不过是扩展 ICommand 的简单类,如下所示
import { ICommand } from '@nestjs/cqrs';
import { AccountDto } from '../dto/Account.dto';

export class AccountCommand implements ICommand {
    constructor(
        public readonly AccountDto: AccountDto
    ) { }
}
|
现在在 dto 文件夹中创建Account.dto.ts和getAccount.dto.ts文件
现在在account文件夹中创建commands.handler.ts并归档query.handler.ts
commands.handler.ts
import { CommandHandler, EventPublisher, ICommandHandler } from "@nestjs/cqrs";;
import { AccountCommand } from "./commands/Account.command";
import { AccountRepository } from "./Account.repository";
import { AccountDto } from './dto/Account.dto';

@CommandHandler(AccountCommand)
export class AccountCommandHandler implements ICommandHandler<AccountCommand> {
    constructor(
        private readonly AccountRepo: AccountRepository,
        private readonly publisher: EventPublisher,
    ) { }

    // @ts-ignore
    async execute(command: AccountCommand,resolve:(value?)=> void): Promise<any> {

        const AccoutResponse = this.publisher.mergeObjectContext(
            await this.AccountRepo.createAccount(command.AccountDto),
        );
        return AccoutResponse;
    }
}
|
query.handler.ts
import { EventPublisher, IQueryHandler, QueryHandler } from "@nestjs/cqrs";
import { GetAccountQuery } from "./query/get-account.query";
import { AccountRepository } from "./Account.repository";

@QueryHandler(GetAccountQuery)
export class AccountQueryHandler implements IQueryHandler<any> {
    constructor(
        private readonly repository: AccountRepository,
        private readonly publisher: EventPublisher,
    ) { }

    // @ts-ignore
    async execute(query: GetAccountQuery, resolve: (value?) => void) {
        const AccountUserResponse = this.publisher.mergeObjectContext(
            await this.repository.GetAccount(query.param),
        );
        return AccountUserResponse;
    }
}
|
从服务中,我们实际上是把所有的东西都接入到命令总线上,这样命令处理程序就可以执行它,同样有一个查询程序
其余的部分则由命令处理程序处理。
我们如何关联模型和发布者?
通过使用发布者mergeObjectContext()方法,在我们的命令处理程序中。
而在存储库中,我们正在做的是一些粗略的业务逻辑
在Account文件夹下创建Account.repository.ts文件:
import { Inject, Injectable, Logger } from "@nestjs/common";
import { AccountDto } from "./dto/Account.dto";
import { InjectRepository } from "@nestjs/typeorm";
import { Accountss } from "src/entities/Account.entity";
import { getManager, Repository } from "typeorm";
import { accountMapper } from "./helper/accountMapper";
import 'dotenv/config';
import { GetAccountDto } from "./dto/getAccount.dto";


@Injectable()
export class AccountRepository {
    constructor(
        @InjectRepository(Accountss) private AccountRepo: Repository<Accountss>,
    ) { }

    async createAccount(AccountDto: AccountDto) {
        return await this.produceAccount(AccountDto)
    }

    private async produceAccount(AccountDto: AccountDto): Promise<any> {
        try {
            let mappingAccount = accountMapper(AccountDto)
            let accountCreateInstance = await this.AccountRepo.create(mappingAccount);
            await this.AccountRepo.save(accountCreateInstance)
            return { isAccountCreate: true }
        } catch (error) {
            return error
        }
    }

    async GetAccount(payload: GetAccountDto) {
        return await this.getuserAccount(payload)
    }

    private async getuserAccount(payload: GetAccountDto): Promise<any> {
        try {
            return await this.AccountRepo.find({ account_id: Number(payload.account_id), consumer_id: Number(payload.consumer_id) });
        } catch (error) {
            return error
        }
    }

}
|
正如您在Account存储库中看到的,这里我们正在实现业务逻辑并从 DB 检索数据,
在Account.module.ts加入:
import { MiddlewareConsumer, Module } from '@nestjs/common';
import { CqrsModule } from '@nestjs/cqrs';

import { AccountCommandHandler } from './commands.handler';
import { AccountQueryHandler } from './query.handler';
import { AccountService } from './Account.service';
import { AccountRepository } from './Account.repository';
import { AccountController } from './Account.controller';
import { AccountCommand } from './commands/Account.command';
import { TypeOrmModule } from '@nestjs/typeorm';
import { Accountss } from 'src/entities/Account.entity';
import 'dotenv/config';


@Module({
    imports: [
        TypeOrmModule.forFeature([Accountss]),
        CqrsModule
    ],
    providers: [
        AccountService,
        AccountRepository,
        AccountCommandHandler,
        AccountCommand,
        AccountQueryHandler,
    ],
    controllers: [AccountController],
    exports: [AccountService],
})
export class AccountModule {}
|
在这里,我们导入了像AccountCommand、AccountQueryHandler这样的模块,如果你了解NestJs,你就已经知道了。
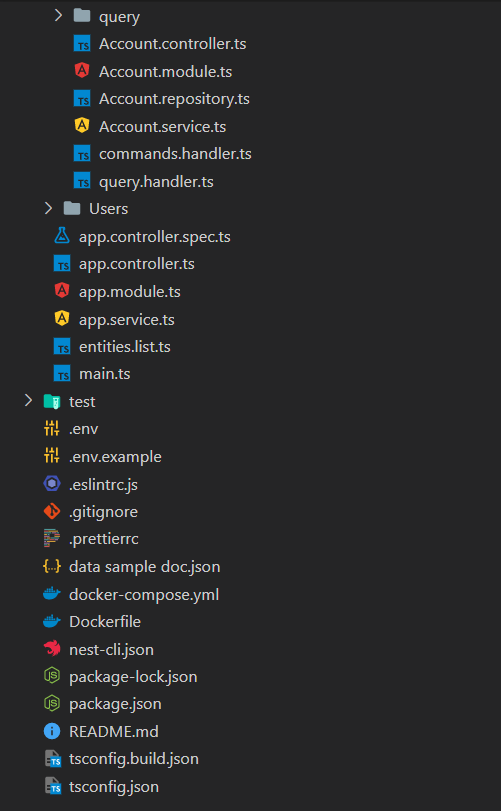
这个项目结构看起来像
第1部分:
第2部分:
SQL脚本:
USE [hk_db_dev]
GO

/****** Object:  Table [dbo].[hk_accounts]    Script Date: 21/08/2022 3:45:46 am ******/
SET ANSI_NULLS ON
GO

SET QUOTED_IDENTIFIER ON
GO

CREATE TABLE [dbo].[hk_accounts](
    [id] [int] IDENTITY(1,1) NOT NULL,
    [account_id] [bigint] NULL,
    [consumer_id] [bigint] NULL,
    [account_nature] [nvarchar](255) NULL,
    [account_type] [nvarchar](255) NULL,
    [active] [int] NULL,
    [balance_amount] [decimal](19, 2) NULL,
    [box_color] [nvarchar](255) NULL,
    [box_icon] [nvarchar](255) NULL,
    [description] [nvarchar](255) NULL,
    [flex1] [nvarchar](255) NULL,
    [flex2] [nvarchar](255) NULL,
    [flex3] [nvarchar](255) NULL,
    [flex4] [nvarchar](255) NULL,
    [flex5] [nvarchar](255) NULL,
    [flex6] [nvarchar](255) NULL,
    [gl_account_no] [nvarchar](255) NULL,
    [title] [nvarchar](255) NULL,
    [opening_balance] [decimal](19, 2) NULL,
    [bank_name] [nvarchar](255) NULL,
    [record_created_on] [datetime] NULL,
    [is_sync] [int] NULL,
    [device_type] [nvarchar](255) NULL,
    [sys_defined] [int] NULL,
    [net_amount_total] [decimal](19, 2) NULL,
PRIMARY KEY CLUSTERED
(
    [id] ASC
)WITH (PAD_INDEX = OFF, STATISTICS_NORECOMPUTE = OFF, IGNORE_DUP_KEY = OFF, ALLOW_ROW_LOCKS = ON, ALLOW_PAGE_LOCKS = ON) ON [PRIMARY]
) ON [PRIMARY]
GO

ALTER TABLE [dbo].[hk_accounts] ADD  DEFAULT ((0.00)) FOR [balance_amount]
GO

ALTER TABLE [dbo].[hk_accounts] ADD  DEFAULT ((0.00)) FOR [opening_balance]
GO

ALTER TABLE [dbo].[hk_accounts] ADD  DEFAULT ((0.00)) FOR [is_sync]
GO

ALTER TABLE [dbo].[hk_accounts] ADD  DEFAULT ((0.00)) FOR [sys_defined]
GO

ALTER TABLE [dbo].[hk_accounts] ADD  DEFAULT ((0.00)) FOR [net_amount_total]
GO
|
为 NestJs 设置 Dockerfile
您很可能听说过 docker,我们看到 dockerizing 应用程序是一种有助于简化部署操作的便捷过程。 创建应用程序的 NesJs(CQRS) Docker 映像会很有帮助。
创建 Dockerfile
现在继续前进,我们将创建一个 Dockerfile。
现在在 Dockerfile 中添加以下命令:
FROM node:14-alpine AS builder
WORKDIR "/app"
COPY . .
RUN npm ci
RUN npm run build
RUN npm prune --production
FROM node:14-alpine AS production
WORKDIR "/app"
COPY --from=builder /app/package.json ./package.json
COPY --from=builder /app/package-lock.json ./package-lock.json
COPY --from=builder /app/dist ./dist
COPY --from=builder /app/node_modules ./node_modules
CMD [ "sh", "-c", "npm run start:prod"]
|
- 在第一步中,我们将节点映像用作builder, builder是多阶段 Dockerfile 中上一个阶段的名称。它可能正在构建应用程序管理器。
- 下一步将我们的工作目录指定为/app.
- 在下一步中,将包文件复制到工作目录。
- 下一步,npm ci 用于从package-lock.json 文件中安装所有确切的版本依赖项或 devDependencies
- 接下来,我们运行一个npm run build 命令来构建生产代码。这会将构建应用程序代码放置/dist 在工作目录内的文件夹中。
- node_modules成功构建后,我们可以从文件夹中删除任何非生产依赖项。 我们运行命令npm prune — production,它列举了我们只想保留生产依赖项。
- 现在,在将用于创建应用程序映像的 DockerFile 的最后一步中,我们复制文件夹和文件。
- COPY — from=builder /这个命令通常是一个 COPY 命令将一个文件从构建上下文复制到图像中。但使用— from 它代替的是从先前构建阶段的文件系统复制。在此之上的某个地方,您将看到 FROM 任何 AS 构建器和一些构建指令,因此它是从中复制的。
现在我们可以运行命令来启动容器中的代码。
设置 docker-compose.yml
为什么我们使用 docker-compose?
→ 将我们的 docker 容器运行设置保存在易于阅读的文件中。 → 创建单线开发环境初创公司。
创建 docker-compose.yml 文件
docker-compose.yml现在在文件中添加以下配置。
version: '3.2'
services:
  nest-projectcqrs:
    build:
      context: .
      dockerfile: 'Dockerfile'
    ports:
      - '3000:3000'
    environment:
      - APP_PORT=3000
|
现在构建 NestJs 图像
运行以下命令构建镜像并运行
docker-compose up -d --build nest-projectcqrs
|
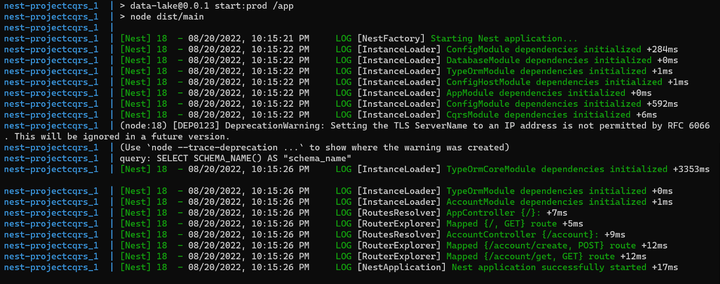
如上图所示,项目运行成功。

上图帐户已创建

上图成功帐户提取
概括:
希望这篇文章能提供一些关于 NestJS 应用程序中 CQRS 设计模式实现的有用信息。我很高兴在下面的评论部分收到您的反馈、建议和进步的技术。
源码项目