在本教程中,我想使用docker compose演示Redis Master Slave(只读副本),以用于Spring Boot应用程序的本地开发目的。
Redis主从站:
Redis是一个非常快的内存数据库,非常适合为应用程序缓存经常访问的数据。大多数应用程序读取繁重的操作,其中涉及具有多个表联接的复杂查询。因此,在每次都不会更改时将信息缓存在redis中是非常有意义的。尽管它有助于提高应用程序性能,但当所有应用服务器实例继续向Redis发送读写请求时,它可能会增加单个Redis实例的负载。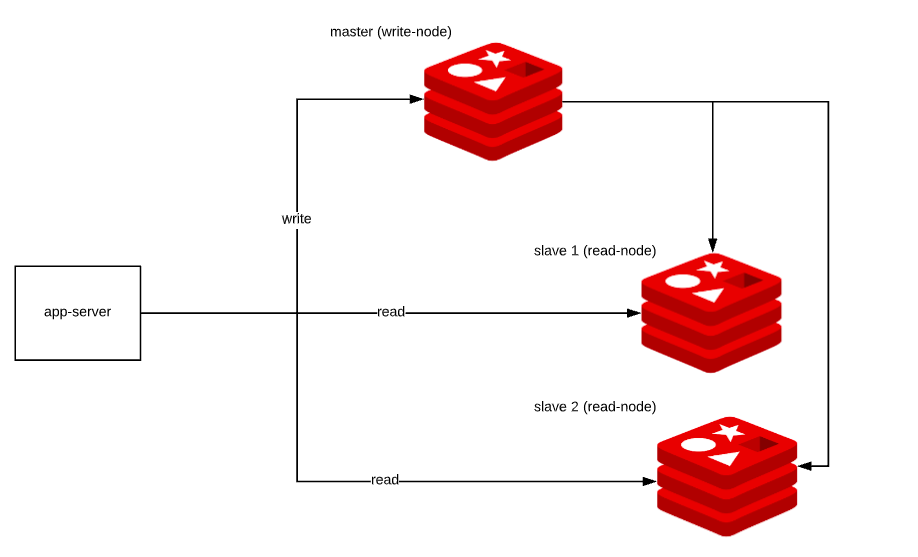
我们可以水平缩放Redis。我们可以使用主从架构 运行Redis的多个实例,其中master是写节点,而slave充当只读节点。对主服务器的任何更新将自动与从属节点异步同步。对从节点的任何写尝试都将被拒绝。
Redis主从站–设置:
- 设置redis master slave非常容易!首先从这里下载这个redis conf文件
- 在文件中查找“ REPLICATION”部分。
################################# REPLICATION ################################# |
- 取消注释,更新为主节点ip和端口。
- 假设我们在网络中使用以下名称运行3个Redis实例
- 主
- 备1
- 备2
- 然后应使用如下所示的配置更新slave-1和slave-2。
replicaof master 6379
- 我们可以使用下面的docker-compose文件,它将启动Redis实例的1个主服务器和2个从属服务器。在下面的docker-compose文件中,我们将卷映射到redis从属实例以共享conf文件;我已经将上面的redis.conf文件放置在本地conf目录中。相应地更新您的docker-compose文件。
- Redis备站启动时将自动连接到主站。
- 使用下面文件启动并运行docker-compose服务后,访问localhost:8081时,您应该可以访问redis-commander工具。您还应该能够看到主节点和从节点。
version: '3' |
Spring Boot应用
让我们创建一个简单的Spring Boot应用程序,以了解如何将Redis集群与主从一起使用。
- 创建具有以下依赖项的spring boot项目
<dependency>
  <groupId>org.springframework.boot</groupId>
  <artifactId>spring-boot-starter-data-redis</artifactId>
</dependency>
<dependency>
  <groupId>org.springframework.boot</groupId>
  <artifactId>spring-boot-starter-web</artifactId>
</dependency> - application.yaml
redis:
  master:
    host: localhost
    port: 6379
  slaves:
    - host: localhost
      port: 16379
    - host: localhost
port: 26379 - 配置Bean
@Configuration
@ConfigurationProperties(prefix = "redis")
public class RedisConfiguration {

    private RedisInstance master;
    private List<RedisInstance> slaves;

    RedisInstance getMaster() {
        return master;
    }

    void setMaster(RedisInstance master) {
        this.master = master;
    }

    List<RedisInstance> getSlaves() {
        return slaves;
    }

    void setSlaves(List<RedisInstance> slaves) {
        this.slaves = slaves;
    }

    @Bean
    public LettuceConnectionFactory redisConnectionFactory() {
        LettuceClientConfiguration clientConfig = LettuceClientConfiguration.builder()
                .readFrom(ReadFrom.REPLICA_PREFERRED)
                .build();
        RedisStaticMasterReplicaConfiguration staticMasterReplicaConfiguration = new RedisStaticMasterReplicaConfiguration(this.getMaster().getHost(), this.getMaster().getPort());
        this.getSlaves().forEach(slave -> staticMasterReplicaConfiguration.addNode(slave.getHost(), slave.getPort()));
        return new LettuceConnectionFactory(staticMasterReplicaConfiguration, clientConfig);
    }

    private static class RedisInstance {

        private String host;
        private int port;

        String getHost() {
            return host;
        }

        void setHost(String host) {
            this.host = host;
        }

        int getPort() {
            return port;
        }

        void setPort(int port) {
            this.port = port;
        }
    }

} - REST控制器
@RestController
public class RedisController {

    private static final String KEY = "VINSGURU";

    @Autowired
    private StringRedisTemplate template;

    @GetMapping("/{name}")
    public void addToSet(@PathVariable String name) {
        this.template.opsForSet().add(KEY, name);
    }

    @GetMapping("/get")
    public Set<String> getKeyValues() {
        return this.template.opsForSet().members(KEY);
    }

}
Redis Master Slave的设置非常简单。Redis复制也非常快。我进行了性能测试,使用JMeter将10000个密钥添加到具有10个并发用户的Redis master中。我几乎可以立即看到从属节点中的所有10000键。
此项目可在此处获得。