安卓专题
使用安卓Material Design开发一个天气应用
这篇文章描述如何使用Android的material design guidelines设计一个天气应用. Material Design是一系列虚拟设计 UI交互 动作等的规则,这些规则帮助开发者能设计和创建一个安卓应用。
下面我们描述如何使用Weatherlib 作为天气库结合Material design规则创建一个天气应用. 我们开发的这个应用不仅支持Android 5 Lollipop(支持Material design ) ,而且要能支持Android之前版本如4.x Kitkat. 因此,我们需要引入appCompat v7 library帮助我们在以前版本实现Material Design
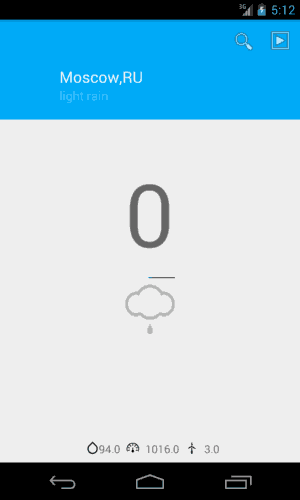
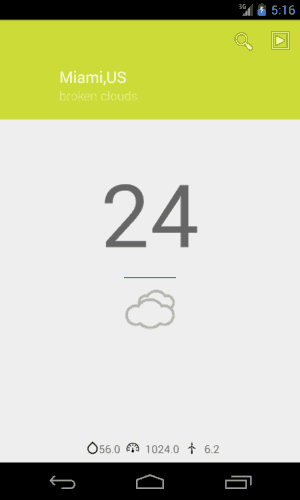
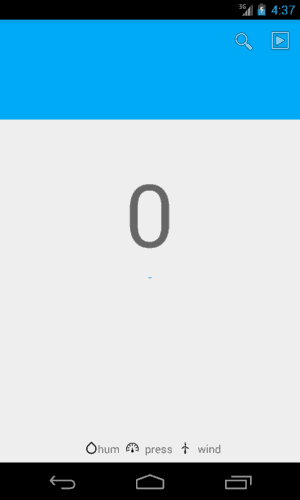
我们的应用有一个extended Toolbar 能够显示有关位置 当前天气 温度 湿度 风向 气压等信息,最后我们的节目类似下面这样:
安卓项目设置
首先我们要配置使用Weatherlib 和appCompat v7. 打开build.gradle配置文件,加入:
dependencies {
compile fileTree(dir: 'libs', include: ['*.jar'])
compile 'com.android.support:appcompat-v7:21.0.+'
compile 'com.mcxiaoke.volley:library:1.0.6@aar'
compile 'com.survivingwithandroid:weatherlib:1.5.3'
compile 'com.survivingwithandroid:weatherlib_volleyclient:1.5.3'
}
应用布局:Materail Design
正如之前提到,我们要使用 Toolbar,它是一个action bar,能给我们更多控制,区别于Action bar,它会紧紧和Actvitiy绑定, 一个Toolbar能放在View层次任何地方.
我们的布局layout划分主要下面几个区域:
- Toolbar区域
- 天气icon和温度
- 其他天气数据
布局内容如下:
<RelativeLayout xmlns:android="http://schemas.android.com/apk/res/android"
xmlns:tools="http://schemas.android.com/tools"
android:layout_width="match_parent"
android:layout_height="match_parent"
tools:context=".WeatherActivity"
android:orientation="vertical">
<android.support.v7.widget.Toolbar
xmlns:app="http://schemas.android.com/apk/res-auto"
android:id="@+id/my_toolbar"
android:layout_height="128dp"
app:popupTheme="@style/ActionBarPopupThemeOverlay"
android:layout_width="match_parent"
android:background="?attr/colorPrimary"
android:paddingLeft="72dp"
android:paddingBottom="16dp"
android:gravity="bottom"
app:titleTextAppearance="@style/Toolbartitle"
app:subtitleTextAppearance="@style/ToolbarSubtitle"
app:theme="@style/ThemeOverlay.AppCompat.Light"
android:title="@string/location_placeholder"
/>
....
</RelativeLayout>
正如你看到我们使用Toolbar. 设置toolbar高度等于128dp, 我们使用初始颜色作为背景,初始颜色是在colors.xml定义. 你能按照 material design color guidelines 获得更多情况. 我们至少定义了三种不同颜色:
- 初始颜色, 500
- 初始黑颜色, identified by 700
- 强调颜色用于初始动作按钮。
我们的toolbar背景颜色是设置为初始颜色
<resources>
<color name="primaryColor_500">#03a9f4</color>
<color name="primaryDarkColor_700">#0288d1</color>
....
</resources>
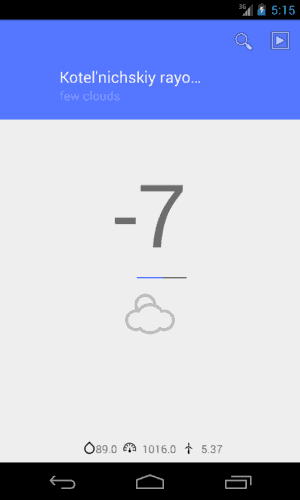
左内填充和底部填充工具栏定义都是根据要求设置。最后我们添加菜单项用于操作栏。主要的结果如下所示:
查询城市
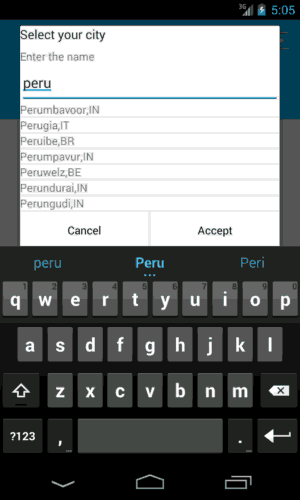
我们使用popup弹出窗口让用户输入地理位置,弹窗很简单,它是使用 EditText ,可以输入数据和简单的ListView来显示在EditText输入的城市, 具体参考how to search a city in weatherlib,结果如下:
<LinearLayout xmlns:android="http://schemas.android.com/apk/res/android"
android:orientation="vertical" android:layout_width="match_parent"
android:layout_height="match_parent"
>
<TextView
android:layout_width="match_parent"
android:layout_height="wrap_content"
android:text="@string/dialog.city.header"
style="@style/Theme.AppCompat.Dialog"/>
<TextView
android:layout_width="match_parent"
android:layout_height="wrap_content"
android:layout_marginTop="8sp"
android:text="@string/dialog.city.pattern"/>
<EditText
android:layout_width="match_parent"
android:layout_height="wrap_content"
android:layout_marginTop="8dp"
android:id="@+id/ptnEdit"/>
<ListView
android:layout_width="wrap_content"
android:layout_height="wrap_content"
android:id="@+id/cityList"
android:clickable="true"/>
</LinearLayout>
下面代码创建和处理对话:
private Dialog createDialog() {
AlertDialog.Builder builder = new AlertDialog.Builder(this);
LayoutInflater inflater = this.getLayoutInflater();
View v = inflater.inflate(R.layout.select_city_dialog, null);
builder.setView(v);
EditText et = (EditText) v.findViewById(R.id.ptnEdit);
....
et.addTextChangedListener(new TextWatcher() {
....
@Override
public void onTextChanged(CharSequence s, int start, int before, int count) {
if (count > 3) {
// We start searching
weatherclient.searchCity(s.toString(), new WeatherClient.CityEventListener() {
@Override
public void onCityListRetrieved(List<City> cities) {
CityAdapter ca = new CityAdapter(WeatherActivity.this, cities);
cityListView.setAdapter(ca);
}
});
}
}
});
builder.setPositiveButton("Accept", new DialogInterface.OnClickListener() {
@Override
public void onClick(DialogInterface dialog, int which) {
dialog.dismiss();
// We update toolbar
toolbar.setTitle(currentCity.getName() + "," + currentCity.getCountry());
// Start getting weather
getWeather();
}
});
builder.setNegativeButton("Cancel", new DialogInterface.OnClickListener() {
@Override
public void onClick(DialogInterface dialog, int which) {
dialog.dismiss();
}
});
return builder.create();
}
一个重要提示是在大约33行, 我们安卓用户选择的城市设置了toolbar标题,然后我们得到当前天气,这个代码运行结果如下:
我们通过WeatherLib获得天气情况,代码如下:
private void getWeather() {
weatherclient.getCurrentCondition(new WeatherRequest(currentCity.getId()),
new WeatherClient.WeatherEventListener() {
@Override
public void onWeatherRetrieved(CurrentWeather currentWeather) {
// We have the current weather now
// Update subtitle toolbar
toolbar.setSubtitle(currentWeather.weather.currentCondition.getDescr());
tempView.setText(String.format("%.0f",currentWeather.weather.temperature.getTemp()));
pressView.setText(String.valueOf(currentWeather.weather.currentCondition.getPressure()));
windView.setText(String.valueOf(currentWeather.weather.wind.getSpeed()));
humView.setText(String.valueOf(currentWeather.weather.currentCondition.getHumidity()));
weatherIcon.setImageResource(WeatherIconMapper.getWeatherResource(currentWeather.weather.currentCondition.getIcon(), currentWeather.weather.currentCondition.getWeatherId()));
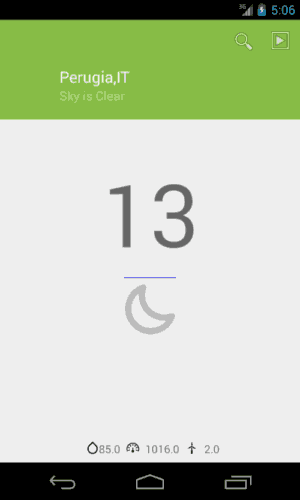
setToolbarColor(currentWeather.weather.temperature.getTemp());
}
....
}
你可以在8行左右注意到我们根据当前的天气设置工具栏字幕显示,在第15行我们根据当前温度改变工具栏的颜色。将工具栏背景颜色更改为我们Material Design指南中所示的原色。