5 Web层的实现
J2EE的登录功能主要是在Web层实现。在前面架构设计中分析到,通过定制LoginModule登录进入Web层,同时获得了登录用户的角色,而且也将以相应的角色访问EJB层。Web层的实现也分两个步骤:一个是用户资料的管理;另外一个是访问权限的配置。
5.1 用户资料管理
用户资料管理主要是实现新用户注册;用户资料查询修改;丢失密码查询等功能。这些功能都是通过上面章节介绍的接口框架对后台EJB进行操作,建立UserService作为ServiceProxy的实现,如下:
/**
* 接口框架的ServiceProxy的具体应用实现者
* <p>Copyright: Jdon.com Copyright (c) 2003</p>
* <p>Company: 上海极道计算机技术有限公司</p>
* @author banq
* @version 1.0
*/
public class UserService extends ServiceSupport {
private final static String module = UserService.class.getName();
public void perform(Event e) {
Debug.logVerbose("-->enter UserService ", module);
UserManagerLocal userManagerLocal = getUserManagerLocal();
UserEvent userEvent = (UserEvent) e;
switch (userEvent.getActionType()) {
case UserEvent.QUERY:
performQuery(userEvent);
break;
case UserEvent.CREATE:
Debug.logVerbose("-->enter create userId: ", module);
userManagerLocal.createUser(userEvent);
break;
case UserEvent.EDIT:
Debug.logVerbose("-->enter edit ", module);
if (validateUser(userEvent))
userManagerLocal.updateUser(userEvent);
else {
Debug.logVerbose(
" the user in UserForm is not the user in session. ", module);
userEvent.setErrors(Constants.SYSTEM_ERROR);
}
break;
default:
Debug.logVerbose("no this actionType " + userEvent.getActionType(),
module);
break;
}
}
//使用内存状态中的User与用户输入的User资料进行比较,确认合法性
private boolean validateUser(UserEvent userEvent) {
boolean success = false;
User user = userEvent.getUser();
SecurityFacadeLocal sf = (SecurityFacadeLocal) eJBControllerLocal;
if (sf.getUser() != null) {
String userId = sf.getUser().getUserId();
user.setUserId(userId);
success = true;
}
return success;
}
private UserManagerLocal getUserManagerLocal() {
UserManagerLocal userManagerLocal = null;
try {
SecurityFacadeLocal securityFacadeLocal = (SecurityFacadeLocal)
eJBControllerLocal;
Debug.logVerbose("-->get SecurityFacadeLocal ", module);
userManagerLocal = securityFacadeLocal.getUserManager();
} catch (Exception ex) {
Debug.logError(" getUserManagerLocal() error: " + ex, module);
}
return userManagerLocal;
}
//查询用户
private void performQuery(UserEvent userEvent) {
User user = userEvent.getUser();
if (user == null) {
Debug.logVerbose("-->enter query the user in session ", module);
SecurityFacadeLocal sf = (SecurityFacadeLocal) eJBControllerLocal;
user = sf.getUser();
} else {
String email = user.getEmail();
if (email != null) {
Debug.logVerbose("-->enter query by email " + email, module);
user = getUserManagerLocal().getUserByEmail(email);
}
}
userEvent.setUser(user);
}
}
在UserService中将前台界面提交的关于用户资料新增、修改或查询命令传递到后台EJB中处理,其中:
SecurityFacadeLocal sf = (SecurityFacade Local) eJBControllerLocal;
user = sf.getUser();
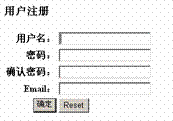
图6-7 用户注册界面 |
是从有状态Session Bean SecurityFacade中获得User实例。由于SecurityFacade在第一次被调用后,将一直保存着User实例的数据,因此,只要该用户没有退出系统,其他的数据将一直保存在内存中,供其他程序反复调用。
以用户注册为例,用户注册实际就是用户资料的新增,其signup.jsp页面外观如下:
在signup.jsp中,将图6-7中表单提交到Web层后由Struts的Action来实现,建立SaveSignUpAction如下:
public class SaveSignUpAction extends Action {
public final static String module = SaveSignUpAction.class.getName();
public ActionForward execute(ActionMapping actionMapping,
ActionForm actionForm,
HttpServletRequest request,
HttpServletResponse response) throws
Exception {
FormBeanUtil.remove(actionMapping, request);
UserForm userForm = (UserForm) actionForm;
//检查提交的表单中有无逻辑错误
if (!checkErrors(userForm, request).isEmpty())
return (actionMapping.getInputForward());
//创建一个UserEvent
UserEvent userEvent = createUserEvent(userForm, request);
//递交给接口框架处理
ServiceProxyHandler.perform(userEvent, request);
//处理完成后,如果没有错误,显示注册成功信息
if (userEvent.getErrors() == null) {
if (userEvent.getActionType() == userEvent.CREATE)
return actionMapping.findForward("createOk");
else
return actionMapping.findForward("editOk");
} else {
ActionErrors errors = new ActionErrors();
errors.add(ActionErrors.GLOBAL_ERROR,
new ActionError(userEvent.getErrors()));
saveErrors(request, errors);
return actionMapping.getInputForward();
}
}
//create a UserEvent
private UserEvent createUserEvent(UserForm userForm, HttpServletRequest request)
throws Exception {
Debug.logVerbose(" --> getUserEvent ", module);
String action = userForm.getAction();
UserEvent userEvent = new UserEvent(module);
User user = new UserModel();
try {
PropertyUtils.copyProperties(user, userForm);
userEvent.setUser(user);
userEvent.setActionType(FormBeanUtil.actionTransfer(action));
} catch (Exception e) {
Debug.logError("getUserEvent error" + e, module);
throw new Exception(e);
}
return userEvent;
}
}
在前面章节已经提到,Action的代码已经可以非常模板化,不同的只是基本对象的区别。在eventmappings.xml建立下列对应关系:
<event-mapping>
<web-action-name>
com.jdon.security.web.SaveSignUpAction
</web-action-name>
<service-proxy-class>
com.jdon.security.service.UserService
</service-proxy-class>
</event-mapping>
这样,SaveSignUpAction将UserEvent通过UserService交由EJB处理。
再以用户资料修改为例创建EditSignUpAction.java。用户成功登录后,通过直接调用http://localhost:8080/AuthTest/auth/editSignUpAction.do,将显示如图6-7所示的包含用户注册数据的画面,用户的ID无需从网址URL中输入,因为该用户已经登录,用户资料保留在系统内存中,可以直接调用出来。
EditSignUpAction.java代码如下:
public class EditSignUpAction extends Action {
public final static String module = EditSignUpAction.class.getName();
public ActionForward execute(ActionMapping mapping,
ActionForm form,
HttpServletRequest request,
HttpServletResponse httpServletResponse) throws Exception {
String action = FormBeanUtil.EDIT_STR;
int actionInt = FormBeanUtil.actionTransfer(action);
if (form == null) {
form = new UserForm();
FormBeanUtil.save(form, mapping, request);
}
UserForm userForm = (UserForm) form;
//从后台获得已经存在的表单数据
getSignUpForm(actionInt, userForm, request);
userForm.setAction(action);
return (mapping.findForward("success"));
}
private void getSignUpForm(int actionInt, UserForm userForm,
HttpServletRequest request) {
UserEvent userEvent = new UserEvent(module);
userEvent.setActionType(userEvent.QUERY);
try {
//提交UserService实现Query查询操作
ServiceProxyHandler.perform(userEvent, request);
//从userEvent获得结果
User user = userEvent.getUser();
Debug.logVerbose(" user name is" + user.getName() + " userId is" +
user.getUserId(), module);
PropertyUtils.copyProperties(userForm, user);
userForm.setPassword2(user.getPassword());
} catch (Exception e) {
Debug.logError("getSignUpForm error" + e, module);
}
}
}
5.2 Web容器安全配置
假设Web层目录结构如下:
SAMPLE
|
|--- WEB-INF
|----admin
|--- account
|
|----- auth
account目录是对任何人都开放的,而auth是授权注册用户才能访问。
本例中设定两个角色admin和user,角色admin代表系统的管理员,而user则代表注册用户。这两个角色需要在Web层定义,在web.xml加入如下语句:
<security-role>
<role-name>Admin</role-name>
</security-role>
<security-role>
<role-name>User</role-name>
</security-role>
定义了角色名称,下一步需要进行访问控制权限的分配,希望管理员角色可以访问Web中admin路径下的所有JSP文件或其他任何资源,那么在web.xml中配置:
<security-constraint>
<display-name>admin</display-name>
<Web-resource-collection>
<Web-resource-name>Admin Area</Web-resource-name>
<!-- admin路径下所有资源 -->
<url-pattern>/admin/*</url-pattern>
<!-- protected路径下所有资源 -->
<url-pattern>/account/auth/*</url-pattern>
</Web-resource-collection>
<auth-constraint>
<!-- 定义角色为admin -->
<role-name>admin</role-name>
</auth-constraint>
<user-data-constraint>
<transport-guarantee>NONE</transport-guarantee>
</user-data-constraint>
</security-constraint>
这样,如果用户以网址http://localhost:8080/admin/访问时,容器将检验通过登录验证用户的角色,如果是admin角色,将会正常访问,否则会被拒绝。
希望一般注册用户user能够访问路径account/auth下任何资源,同时也可以设定角色admin拥有该目录下的资源访问权限。
<security-constraint>
<display-name>User protected</display-name>
<Web-resource-collection>
<Web-resource-name> Protected Area </Web-resource-name>
<!-- protected路径下所有资源 -->
<url-pattern>/account/auth/*</url-pattern>
<!-- auth路径下所有资源 这并不是对应一个实际路径
对应Strutss中Action的path,说明以auth为路径的
所有Action也只有角色user能够访问
-->
<url-pattern>/auth/*</url-pattern>
</Web-resource-collection>
<auth-constraint>
<!-- 定义角色为user -->
<role-name>user</role-name>
</auth-constraint>
<user-data-constraint>
<transport-guarantee>NONE</transport-guarantee>
</user-data-constraint>
</security-constraint>
在Strutss-config.xml中有如下配置:
…
<action path="/saveSignUpAction" name="userForm"
type="com.jdon.security.web.SaveSignUpAction"
validate="true" input="/account/signup.jsp" scope="request"
>
<forward name="createOk" path="/account/auth/success.jsp" />
<forward name="editOk" path="/account/auth/success.jsp" />
</action>
<action path="/auth/editSignUpAction" attribute="userForm"
type="com.jdon.security.web.EditSignUpAction"
validate="false" scope="request" >
<forward name="success" path="/account/signup.jsp" />
</action>
根据web.xml中的配置,路径为/auth/ editSignUpAction的EditSignUpAction只有注册用户才可以访问,因为没有设置根路径“/*”的访问限制,所以SaveSignUpAction则是任何用户都可以访问。
完成了访问控制权限的设置,现在可以设置用户的登录方式了。用户的登录有两种方式,即基于HTTP的登录验证方式和表单登录验证方式。
基本登录方式:
<login-config>
<auth-method>BASIC</auth-method>
<realm-name>register user</realm-name>
</login-config>
那么,当用户访问受限制资源时,J2EE容器将自动提示界面如图6-2所示,要求用户输入用户名和密码。
表单登录验证方式:
<login-config>
<auth-method>FORM</auth-method>
<realm-name>SecurityRealm</realm-name>
<form-login-config>
<form-login-page>/account/login.jsp</form-login-page>
<form-error-page>/account/login_error.jsp</form-error-page>
</form-login-config>
<login-config>
当用户访问受限制资源时,J2EE容器自动将/account/login.jsp推向浏览器界面,要求用户输入用户名和密码,如图6-3所示。
最后,为了使Web容器的安全机制激活,需要指定特定的LoginModule,这和具体J2EE服务器相关,在JBoss中,需要配置jboss=web.xml如下:
<security-domain>java:/jaas/ JdonSecurity </security-domain>
这表示web层的安全域将使用名为JdonSecurity 的JAAS配置。关于JAAS配置JdonSecurity将在6节介绍。