使用现代Java 21 Vanilla构建PostgreSQL Wire协议服务器 这是一个教程,旨在显示如何用途:
- - PostgreSQL Wire
- 显示自 JDK 17 以来的大部分新功能的实际示例,包括:
- 记录 (JEP 395)
- 密封型 (JEP 360/JEP 409)
- 开关模式匹配 (JEP 406)
- 虚拟线程又名 Project Loom (JEP 425)
- Foreign-Function & Memory API (FMM) 又名 Project Panama (JEP 424)(同时给出java.nio'sAsynchronousChannelGroup和'的实际例子,AsynchronousServerSocketChannel网上例子很少)
PostgreSQL Wire 协议简介
PostgreSQL 有线协议是一种二进制协议,用于在 PostgreSQL 客户端和服务器之间进行通信。
该协议记录在PostgreSQL 协议文档中。
在我看来,这份文件并不是最容易理解的。如果您想了解有关该协议的更多信息,我推荐以下演示文稿:
我们今天关心的,主要是以下几条信息:
- Postgres 客户端向服务器发送两种类型的消息:启动消息和命令
- 可选地,启动消息之前可以有SSL 协商消息,其中客户端询问服务器是否支持 SSL
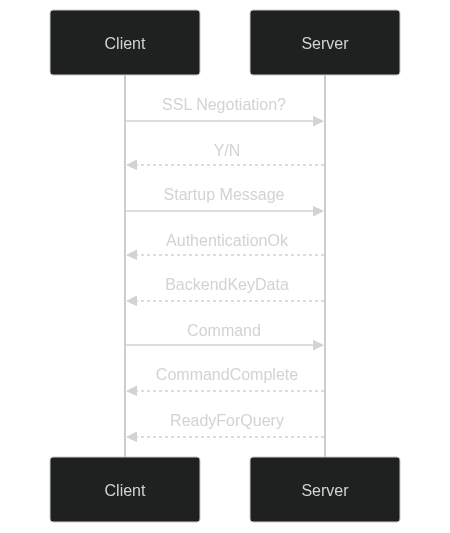
命令有很多种,但今天我们只关注Query命令,它用于执行SQL 查询。
我们将从实现一个基本java.nio.channels.AsynchronousServerSocketChannel服务器开始,它将接受连接并打印出它收到的消息:
步骤 1.1 - 初始服务器框架
下面是我们服务器的初始框架。
- 我们创建一个java.nio.channels.AsynchronousServerSocketChannel并将其绑定到localhost默认的 Postgres 端口 ( 5432)。
- 一个ExecutorService已创建,它将用于java.nio.channels.AsynchronousChannelGroup为我们的服务器创建一个。
- 我们使用该newVirtualThreadPerTaskExecutor方法,它将Virtual Thread为服务器线程池创建一个新的 Loom。
- 然后,我们接受连接并打印出我们收到的消息。
package postgres.wire.protocol;

import java.net.InetSocketAddress;
import java.nio.ByteBuffer;
import java.nio.channels.AsynchronousChannelGroup;
import java.nio.channels.AsynchronousServerSocketChannel;
import java.nio.channels.AsynchronousSocketChannel;
import java.nio.channels.CompletionHandler;
import java.util.concurrent.ExecutorService;
import java.util.concurrent.Executors;
import java.util.concurrent.Future;

class AsynchronousSocketServer {
    private static final String HOST = "localhost";
    private static final int PORT = 5432;

    public static void main(String[] args) throws Exception {
        ExecutorService executor = Executors.newVirtualThreadPerTaskExecutor();
        AsynchronousChannelGroup group = AsynchronousChannelGroup.withThreadPool(executor);

        try (AsynchronousServerSocketChannel server = AsynchronousServerSocketChannel.open(group)) {
            server.bind(new InetSocketAddress(HOST, PORT));
            System.out.println("[SERVER] Listening on " + HOST + ":" + PORT);

            for (;;) {
                Future<AsynchronousSocketChannel> future = server.accept();
                AsynchronousSocketChannel client = future.get();
                System.out.println("[SERVER] Accepted connection from " + client.getRemoteAddress());
                ByteBuffer buffer = ByteBuffer.allocate(1024);
                client.read(buffer, buffer, new CompletionHandler<>() {
                    @Override
                    public void completed(Integer result, ByteBuffer attachment) {
                        attachment.flip();
                        if (result != -1) {
                            onMessageReceived(client, attachment);
                        }
                        attachment.clear();
                        client.read(attachment, attachment, this);
                    }

                    @Override
                    public void failed(Throwable exc, ByteBuffer attachment) {
                        System.err.println("[SERVER] Failed to read from client: " + exc);
                        exc.printStackTrace();
                    }
                });
            }
        }
    }

    private static void onMessageReceived(AsynchronousSocketChannel client, ByteBuffer buffer) {
        System.out.println("[SERVER] Received message from client: " + client);
        System.out.println("[SERVER] Buffer: " + buffer);
    }
}

class MainSimplest {
    public static void main(String[] args) throws Exception {
        AsynchronousSocketServer.main(args);
    }
}
|
如果我们启动它,我们应该看到:
Running Gradle on WSL...

> Task :app:compileJava

> Task :app:processResources NO-SOURCE
Note: Some input files use preview features of Java SE 21.
Note: Recompile with -Xlint:preview for details.
> Task :app:classes

> Task :app:MainSimplestWalkThrough.main()
[SERVER] Listening on localhost:5432
|
连接到服务器psql
现在,我们可以使用以下方式连接到我们的服务器psql:
$ psql -h localhost -p 5432 -U postgres
|
我们应该psql在提示符处看到挂起,服务器应该打印出以下内容:
[SERVER] Accepted connection from /127.0.0.1:41826
[SERVER] Received message from client: sun.nio.ch.UnixAsynchronousSocketChannelImpl[connected local=/127.0.0.1:5432 remote=/127.0.0.1:41826]
[SERVER] Buffer: java.nio.HeapByteBuffer[pos=0 lim=8 cap=1024]
|
我们现在可以接收来自客户端的消息。
步骤 1.2 - 响应 SSL 协商消息和启动消息
我们想要做的只是确保我们能够从客户端接收消息,并响应:
- 带'N'字节的初始 SSL 协商消息(表示否)
- 带有AuthenticationOk消息的 Startup Message
最后,我们会写一个:
- BackendKeyData消息,用于标识与客户端的连接
- ReadyForQuery消息,表示服务器已准备好接受命令。
以下是更新后的代码:
private static void onMessageReceived(AsynchronousSocketChannel client, ByteBuffer buffer) {
        System.out.println("[SERVER] Received message from client: " + client);
        System.out.println("[SERVER] Buffer: " + buffer);

        // First, write 'N' for SSL negotiation
        ByteBuffer response = ByteBuffer.allocate(1);
        response.put((byte) 'N');
        response.flip();
        Future<Integer> writeResult = client.write(response);

        // Then, write AuthenticationOk
        ByteBuffer authOk = ByteBuffer.allocate(9);
        authOk.put((byte) 'R'); // 'R' for AuthenticationOk
        authOk.putInt(8); // Length
        authOk.putInt(0); // AuthenticationOk
        authOk.flip();
        writeResult = client.write(authOk);

        // Then, write BackendKeyData
        ByteBuffer backendKeyData = ByteBuffer.allocate(17);
        backendKeyData.put((byte) 'K'); // Message type
        backendKeyData.putInt(12); // Message length
        backendKeyData.putInt(1234); // Process ID
        backendKeyData.putInt(5678); // Secret key
        backendKeyData.flip();
        writeResult = client.write(backendKeyData);

        // Then, write ReadyForQuery
        ByteBuffer readyForQuery = ByteBuffer.allocate(6);
        readyForQuery.put((byte) 'Z'); // 'Z' for ReadyForQuery
        readyForQuery.putInt(5); // Length
        readyForQuery.put((byte) 'I'); // Transaction status indicator, 'I' for idle
        readyForQuery.flip();
        writeResult = client.write(readyForQuery);

        try {
            writeResult.get();
        } catch (Exception e) {
            System.err.println("[SERVER] Failed to write to client: " + e);
        }
    }
|
从现在开始,能够可视化我们正在发送和接收的消息将很有用。
您可以使用一些工具来执行此操作:
- Wireshark/tshark
- pgs-debug (pgshark的一部分)
- pgmockproxy
我推荐使用 Wireshark 的 GUI,它最容易使用。对于本教程,我将使用pgs-debug, 有两个原因:
- Wireshark 不适用于 WSL
- 我希望能够将 ASCII 输出粘贴到教程中
注意:如果你想要一个关于如何使用 Wireshark 捕获 Postgres 流量的视频教程,我在我的pgprotoktrepo 上有一个简短的演示:要使用 捕获输出pgs-debug,我将使用以下命令:
# Capture on loopback interface
$ sudo pgs-debug --interface lo
|
如果我们启动服务器并连接psql,我们应该看到以下内容:
[user@MSI ~]$ psql -h localhost -p 5432 -U postgres
psql (15.0, server 0.0.0)
WARNING: psql major version 15, server major version 0.0.
         Some psql features might not work.
Type "help" for help.

postgres=>
|
[user@MSI ~]$ sudo pgs-debug --interface lo
Packet: t=1673886702.924458, session=213070643347544
PGSQL: type=SSLRequest, F -> B
SSL REQUEST

Packet: t=1673886702.928187, session=213070643347544
PGSQL: type=SSLAnswer, B -> F
SSL BACKEND ANSWER: N

Packet: t=1673886702.928222, session=213070643347544
PGSQL: type=StartupMessage, F -> B
STARTUP MESSAGE version: 3
  application_name=psql
  database=postgres
  client_encoding=UTF8
  user=postgres


Packet: t=1673886702.928318, session=213070643347544
PGSQL: type=AuthenticationOk, B -> F
AUTHENTIFICATION REQUEST code=0 (SUCCESS)

Packet: t=1673886702.970239, session=213070643347544
PGSQL: type=BackendKeyData, B -> F
BACKEND KEY DATA pid=1234, key=5678

Packet: t=1673886702.970239, session=213070643347544
PGSQL: type=ReadyForQuery, B -> F
READY FOR QUERY type=<IDLE>
|
[SERVER] Listening on localhost:5432
[SERVER] Accepted connection from /127.0.0.1:47544
[SERVER] Received message from client: sun.nio.ch.UnixAsynchronousSocketChannelImpl[connected local=/127.0.0.1:5432 remote=/127.0.0.1:47544]
[SERVER] Buffer: java.nio.HeapByteBuffer[pos=0 lim=8 cap=1024]
[SERVER] Received message from client: sun.nio.ch.UnixAsynchronousSocketChannelImpl[connected local=/127.0.0.1:5432 remote=/127.0.0.1:47544]
[SERVER] Buffer: java.nio.HeapByteBuffer[pos=0 lim=84 cap=1024]
|
步骤 1.3 - 区分 SSL/身份验证请求和命令消息
我们需要能够区分 SSL 协商消息、身份验证请求和标准命令消息。
这样我们就可以将消息正确路由到适当的处理程序。否则我们将无法一次为多个客户提供服务。
为此,我们可以创建一些谓词助手来测试消息类型以确定它是 SSL 请求还是启动消息。
    static Predicate<ByteBuffer> isSSLRequest = (ByteBuffer b) -> {
        return b.get(4) == 0x04
                && b.get(5) == (byte) 0xd2
                && b.get(6) == 0x16
                && b.get(7) == 0x2f;
    };

    static Predicate<ByteBuffer> isStartupMessage = (ByteBuffer b) -> {
        return b.remaining() > 8
                && b.get(4) == 0x00
                && b.get(5) == 0x03 // Protocol version 3
                && b.get(6) == 0x00
                && b.get(7) == 0x00;
    };


    private static void onMessageReceived(AsynchronousSocketChannel client, ByteBuffer buffer) {
        System.out.println("[SERVER] Received message from client: " + client);
        System.out.println("[SERVER] Buffer: " + buffer);

        Future<Integer> writeResult = null;

        if (isSSLRequest.test(buffer)) {
            System.out.println("[SERVER] SSL Request");
            ByteBuffer sslResponse = ByteBuffer.allocate(1);
            sslResponse.put((byte) 'N');
            sslResponse.flip();
            writeResult = client.write(sslResponse);
        } else if (isStartupMessage.test(buffer)) {
            System.out.println("[SERVER] Startup Message");

            // Then, write AuthenticationOk
            ByteBuffer authOk = ByteBuffer.allocate(9);
            authOk.put((byte) 'R'); // 'R' for AuthenticationOk
            authOk.putInt(8); // Length
            authOk.putInt(0); // AuthenticationOk
            authOk.flip();
            writeResult = client.write(authOk);

            // Then, write BackendKeyData
            ByteBuffer backendKeyData = ByteBuffer.allocate(17);
            backendKeyData.put((byte) 'K'); // Message type
            backendKeyData.putInt(12); // Message length
            backendKeyData.putInt(1234); // Process ID
            backendKeyData.putInt(5678); // Secret key
            backendKeyData.flip();
            writeResult = client.write(backendKeyData);

            // Then, write ReadyForQuery
            ByteBuffer readyForQuery = ByteBuffer.allocate(6);
            readyForQuery.put((byte) 'Z'); // 'Z' for ReadyForQuery
            readyForQuery.putInt(5); // Length
            readyForQuery.put((byte) 'I'); // Transaction status indicator, 'I' for idle
            readyForQuery.flip();
            writeResult = client.write(readyForQuery);
        } else {
            System.out.println("[SERVER] Unknown message");
        }

        try {
            System.out.println("[SERVER] Write result: " + writeResult.get());
        } catch (Exception e) {
            System.err.println("[SERVER] Failed to write to client: " + e);
            e.printStackTrace();
        }
    }
|
如果我们重新启动并重新连接psql,我们现在应该看到:
[SERVER] Listening on localhost:5432
[SERVER] Accepted connection from /127.0.0.1:35090
[SERVER] Received message from client: sun.nio.ch.UnixAsynchronousSocketChannelImpl[connected local=/127.0.0.1:5432 remote=/127.0.0.1:35090]
[SERVER] Buffer: java.nio.HeapByteBuffer[pos=0 lim=8 cap=1024]
[SERVER] SSL Request
[SERVER] Write result: 1
[SERVER] Received message from client: sun.nio.ch.UnixAsynchronousSocketChannelImpl[connected local=/127.0.0.1:5432 remote=/127.0.0.1:35090]
[SERVER] Buffer: java.nio.HeapByteBuffer[pos=0 lim=84 cap=1024]
[SERVER] Startup Message
[SERVER] Write result: 6
|
步骤 1.4 - 处理查询并返回数据行
现在,您可能一直在等待的那一刻。让我们处理一个查询并返回一些数据行。
在这种情况下,“处理”意味着我们将只返回一组硬编码的行,而不是实际查询数据库(抱歉让你失望了!)。我确实说过“没有图书馆” =(
为此,我们需要处理Query消息,然后发送RowDescription消息,然后是DataRow每一行的消息,最后是CommandComplete消息。
- 对于我们的RowDescription消息,我们将发送两列,名称为“id”和“name”
- 对于我们的DataRow消息,我们将发送两行,值 (1, "one") 和 (2, "two")
要完成循环,我们最后需要跟进一条ReadyForQuery消息。
这是协议中最复杂的部分,因此下面的注释代码有望帮助您理解发生了什么:
} else {
    System.out.println("[SERVER] Unknown message");
    // Let's assume it's a query message, and just send a simple response
    // First we send a RowDescription. We'll send two columns, with names "id" and "name"
    ByteBuffer rowDescription = ByteBuffer.allocate(51);
    rowDescription.put((byte) 'T'); // 'T' for RowDescription
    rowDescription.putInt(50); // Length
    rowDescription.putShort((short) 2); // Number of fields/columns
    // For each field/column:
    rowDescription.put("id".getBytes()).put((byte) 0); // Column name of column 1 (null-terminated)
    rowDescription.putInt(0); // Object ID of column 1
    rowDescription.putShort((short) 0); // Attribute number of column 1
    rowDescription.putInt(23); // Data type OID of column 1
    rowDescription.putShort((short) 4); // Data type size of column 1
    rowDescription.putInt(-1); // Type modifier of column 1
    rowDescription.putShort((short) 0); // Format code of column 1

    rowDescription.put("name".getBytes()).put((byte) 0); // Column name of column 2 (null-terminated)
    rowDescription.putInt(0); // Object ID of column 2
    rowDescription.putShort((short) 0); // Attribute number of column 2
    rowDescription.putInt(25); // Data type OID of column 2
    rowDescription.putShort((short) -1); // Data type size of column 2
    rowDescription.putInt(-1); // Type modifier of column 2
    rowDescription.putShort((short) 0); // Format code of column 2
    rowDescription.flip();
    writeResult = client.write(rowDescription);

    // Then we send a DataRow for each row. We'll send two rows, with values (1, "one") and (2, "two")
    ByteBuffer dataRow1 = ByteBuffer.allocate(19);
    dataRow1.put((byte) 'D'); // 'D' for DataRow
    dataRow1.putInt(18); // Length (4)
    dataRow1.putShort((short) 2); // Number of columns (5-6)
    dataRow1.putInt(1); // Length of column 1 (7-10)
    dataRow1.put((byte) '1'); // Value of column 1 (11-11)
    dataRow1.putInt(3); // Length of column 2 (12-15)
    dataRow1.put("one".getBytes()); // Value of column 2 (16-18)
    dataRow1.flip();
    writeResult = client.write(dataRow1);

    ByteBuffer dataRow2 = ByteBuffer.allocate(19);
    dataRow2.put((byte) 'D'); // 'D' for DataRow
    dataRow2.putInt(18); // Length
    dataRow2.putShort((short) 2); // Number of columns
    dataRow2.putInt(1); // Length of column 2
    dataRow2.put((byte) '2'); // Value of column 2
    dataRow2.putInt(3); // Length of column 2
    dataRow2.put("two".getBytes()); // Value of column 2
    dataRow2.flip();
    writeResult = client.write(dataRow2);

    // We send a CommandComplete
    ByteBuffer commandComplete = ByteBuffer.allocate(14);
    commandComplete.put((byte) 'C'); // 'C' for CommandComplete
    commandComplete.putInt(13); // Length
    commandComplete.put("SELECT 2".getBytes()); // Command tag
    commandComplete.put((byte) 0); // Null terminator
    commandComplete.flip();
    writeResult = client.write(commandComplete);

    // Finally, write ReadyForQuery
    ByteBuffer readyForQuery = ByteBuffer.allocate(6);
    readyForQuery.put((byte) 'Z'); // 'Z' for ReadyForQuery
    readyForQuery.putInt(5); // Length
    readyForQuery.put((byte) 'I'); // Transaction status indicator, 'I' for idle
    readyForQuery.flip();
    writeResult = client.write(readyForQuery);
}
|
如果我们运行它,我们应该看到以下输出:
psql客户端:
$ psql -h localhost -p 5432 -U postgres
psql (15.0, server 0.0.0)
WARNING: psql major version 15, server major version 0.0.
         Some psql features might not work.
Type "help" for help.

postgres=> select 1;
 id | name
----+------
  1 | one
  2 | two
(2 rows)

postgres=>
|
详细点击标题